


What we’ll explore in this playbook?
Typically, most marketers send form submission as a conversion to Google ads. The problem with this approach is that you’ll also end up sending unqualified leads as a conversion event.
If you look at more tech savvy marketers, they’d implement offline conversions by sending lifecycle stages such as MQL, SQL, Opp, and Closed Won as conversion events as well. However, the problem is most B2B buying cycles are long and can take several weeks before you can say if the lead is MQL or not. And not forget the inaccurate/delayed CRM updates that can wring your entire set up.
In this playbook, we’ll look at how to send “Qualified Booked Meeting” as a conversion signal back to Google Ads instantly after a form submission and never send another unqualified lead as a conversion event.
This way, you are able to close the feedback loop for your Google Ads to learn about what a qualified meeting looks like for your business and can optimize your campaigns for high quality conversions that are more likely to turn into pipeline and closed won revenue. And as a big bonus, you'll never have to send any of the unqualified leads as a conversion signal.
Ready?
Here's a quick flowchart showing you what you can do:

Let’s dive in.
Step 1: Automate lead qualification, disqualification, and meeting booking process
One of the things marketers typically have a hard time with is understanding if the lead they generated is qualified or not and if it moved further down the funnel. In B2B organizations that sell high ACV products, marketers need to wait for weeks to get this data.
Let’s reduce weeks of waiting to minutes by automating the initial qualification/disqualification process and the meeting booking process.
What you’ll need in this step:
- A demo request form/CTA connected to your CRM
- Admin access to CRM
- Separate landing pages for
- Qualified lead who booked a meeting
- Qualified lead who did not book a meeting
- Disqualified lead
- RevenueHero account
- Admin access to RevenueHero
To connect your CRM form to a RevenueHero router, in your RevenueHero account:
- Navigate to Inbound
- Create new router
- Map your CRM form to RevenueHero and choose how these form properties are stored in your CRM.
- Setup Matching rules to ensure that existing accounts/contacts are routed to the same sales rep.
- For net new contacts, set conditions based on form values or enriched data. When these conditions are met, RevenueHero automatically qualifies them, routes them to the right sales rep based on routing conditions you set, and displays their calendar for the prospect to book a meeting. When the conditions aren’t met, the prospect will be automatically disqualified.
- In the final step, enter URLs for where you’d like to redirect prospects. You can enter separate
URLs for:
- Qualified leads who booked a meeting
- Qualified leads who did not book a meeting, and
- Disqualified leads.
Once this is done, you now have a setup where every demo request data is sent to RevenueHero. RevenueHero then checks if each form submission is qualified or not, displays meeting slots of the right sales reps, and passes every meeting activity back to the CRM.
Step 2: Set up Google Tag Manager to send high value conversion signals back to Google Ads
There are two ways you can set up Google Tag Manager to send conversion signals — using page’s URL and using Javascript events.
Don’t worry. We’ll cover them both.
Set up Tag Manager using page URL to send conversions
Fair warning — when you use page URLs to send conversions, you’ll experience some inaccuracies since people can land on the page from other sources even if they don’t fill out the form. Or refresh the page after landing on the thank you page.
In this method, we’ll use the page’s URL to determine if the conversion event happened or not.
Since RevenueHero allows you to add separate URLs for qualified prospects who booked a meeting, qualified prospects who did not book a meeting, and disqualified prospects, we can create separate triggers for each of these cases.
- Navigate to Triggers and click on “New”.
- Create a trigger called “Meeting booked thank you page visit”.
- In Trigger Configuration, select “Page View”.

- Next, select “Some Page Views” under the “This trigger fires on” section.
- Enter URL conditions that need to be true for the event to get triggered.

Next, you’ll need to create a Google Ad Conversion Tag and map this trigger to it so that when the trigger conditions are met, the tag fires a conversion event.
To set up Google Ads conversion measurement, you will need to enter the required Google Ads Conversion ID and Conversion Label, and an optional Conversion Value.
- In Tag Manager, start a new Google Ads tag. From the home screen select New Tag -> Tag Configuration -> Google Ads Conversion Tracking.
- Sign in to your Google Ads account to gather the values that you will use to complete the tag setup:
- In your Google Ads account, click the Tools and Settings menu.
- Select Measurement: Conversions, which opens to the Conversion Actions table.
- Select the name of the conversion that you want to use from the Conversion action column.
- Expand the tab for Tag setup to view the tag details.
- Select Use Google Tag Manager.
- Copy the Conversion ID and Conversion Label.
- In Tag Manager, add the required Conversion ID and Conversion Label values obtained from step 2 to their respective fields. You may optionally add a Conversion Value
- Choose one or more triggers in the Triggering section to specify when the tag should fire.
- Click Save to complete your tag setup.
Similarly, create a trigger for “Qualified prospect thank you page visit” and a tag for when a qualified prospect does not book a demo.
Set up Tag Manager using Javascript Events to send conversions
We’ll use RevenueHero’s Javascript Events to send accurate conversions back to Google Ads. Since we’re using Javascript Events, we have more control over which events we want to send.
Since we’re using RevenueHero, we’re able to qualify prospects and show the scheduler only to them. Every time a meeting is booked through RevenueHero, RevenueHero sends an event called meeting_booked. We’ll capture this event via tag manager and send this to Google ads.
To do this, we’ll need to:
- Create a tag to listen to RevenueHero’s Javascript event
- Create a data layer variable in Google Tag Manager
- Create a custom event trigger to listen to the event
- Create and configure your Google Ads tag to fire on a specific trigger
Don’t worry. We’ll cover each of these steps in detail.
1. Create a tag to listen to RevenueHero’s Javascript event
First, we’ll have to tell Google Tag Manager to listen to RevenueHero’s Javascript event.
To do this:
- Go to “Tags” in GTM and click on “New.”
- Name your tag something descriptive, like “RevenueHero - Meeting Booked Event Listener”.
- Choose “Custom HTML” as the tag type.
- Add the following code in the HTML field:
<script>
 window.addEventListener('message', function (ev)
  {
     if (ev.data.type == 'MEETING_BOOKED')
   {
     window.dataLayer.push({
        'event': 'meeting_booked'
    });
    }
      })
</script>
- In the above script, we’re using
’event’:’meeting_booked’as the event we want to send. - Under “Triggering”, choose for this tag to fire on “All pages”.
- Save your tag.

2. Create a data layer variable in Google Tag Manager
In the previous step, we’re sending ’event’: ‘meeting_booked’ to the data layer of your browser. Next, we’ll need to tell Google Tag Manager that we need it to read this variable’s value (ie. ‘meeting_booked’) that can be passed to other tags and triggers.
To do this:
- In your Google Tag Manager (GTM) account, navigate to “Variables” and click on “New” under “User defined variables”.
- Name your variable something descriptive, like “RevenueHero Meeting Booked Variable.”
- Inside “Variable Configuration”, choose “Data Layer Variable” as the variable type.
- In the “Data Layer Variable Name” field, enter “event” (without quotes).
- Save your variable.

Great! Google Tag Manager will now be able to pass ‘meeting_booked’ as an event once it’s pushed into the data layer by our RevenueHero script.
3. Create a custom event trigger to listen to the event
Next, we need to ensure our events are created only when a meeting is booked. So we’ll create a trigger when the data layer receives the variable that we defined in the previous step.
To do this:
- Go to “Triggers” in GTM and click on “New.”
- Name your trigger something like “RevenueHero - Meeting Booked Event”.
- Choose “Custom Event” as the trigger type.
- In the “Event Name” field, enter “meeting_booked” (without quotes) because this is the value that will be sent to the data layer.
- Leave “this trigger fires on” set to “All custom events”.
- Save your trigger.

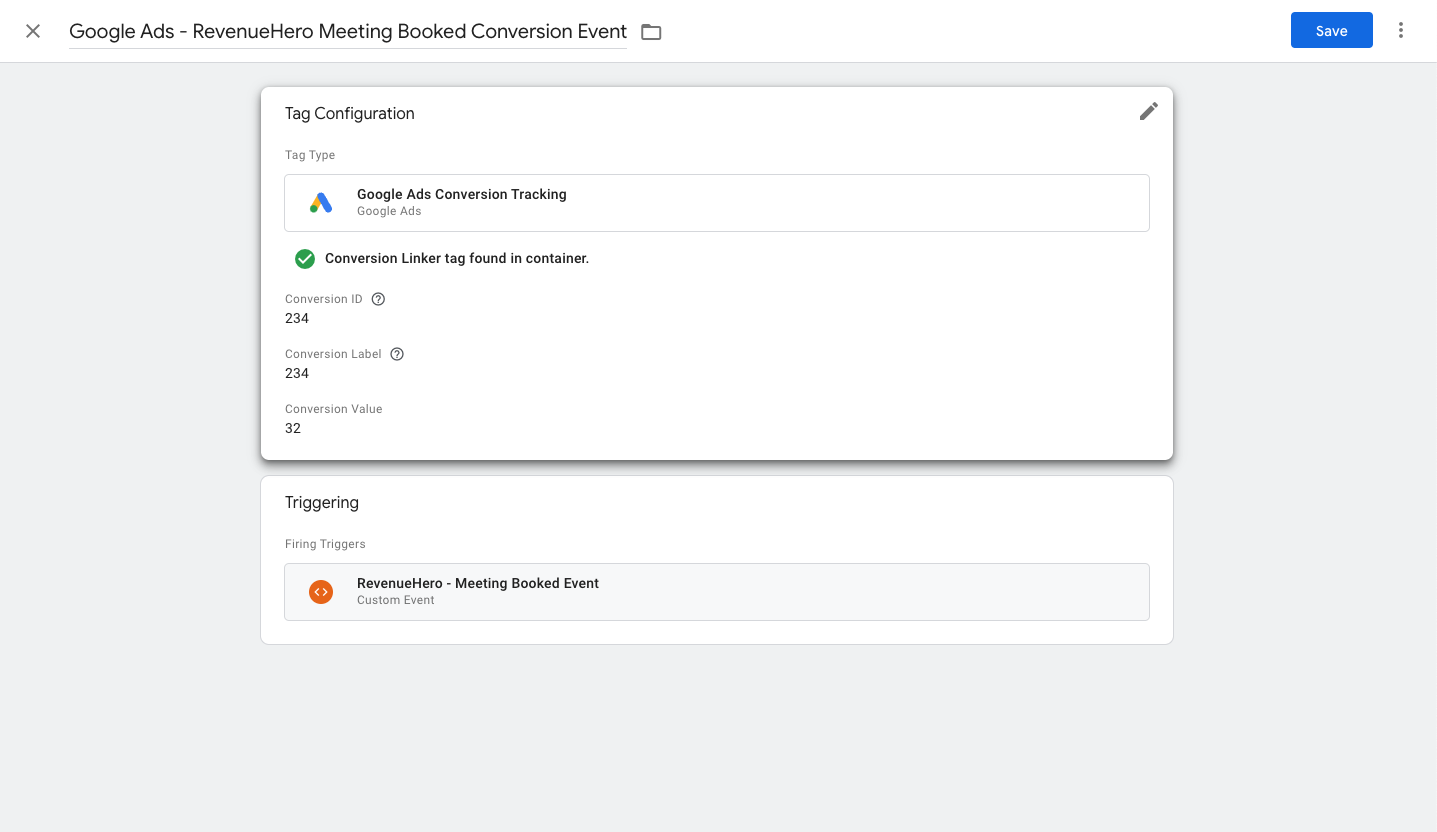
4. Create and configure your Google Ads Conversion tag to fire on a specific trigger
Now that we have a trigger set up, all that’s left to do is fire a tag that will send a conversion event to Google Ads.
To do this:
In Google Tag Manager:
- Create a new tag.
- In the Tag Configuration, select 'Google Conversion Tracking'.
In Google Ads:
- In your Google Ads account, click the Tools and Settings menu.
- Select Measurement: Conversions, which opens to the Conversion Actions table.
- Select the name of the conversion that you want to use from the Conversion action column.
- Expand the tab for Tag setup to view the tag details.
- Select Use Google Tag Manager.
- Copy the Conversion ID and Conversion Label.
Back to Google Tag Manager:
- Enter the Conversion ID and Conversion Label.
- I’d personally recommend including a conversion value as well. The easiest way to arrive at a value is to take your average ACV and multiply it by the conversion rate from meeting booked to closed won.
For example: If your average ACV is $10,000 and your conversion rate from meeting booked to closed won is 10%, enter your conversion value as $1000.
This helps you when you decide to optimize your Google Ads campaigns for ROAS. Of course, ROAS is probably more a B2C or ecommerce metric. But with all things in data, it’s better to have and not need it, than it is to need it and not have.
- Set the trigger for this tag as the trigger we created in the 3rd step. If you followed this playbook to the T, then you should find a trigger called “RevenueHero - Meeting Booked Event”
- Click Save.
Before publishing:
- Preview your Google Tag Manager container: In your Google Tag Manager account, click the “Preview” button to enter preview mode. Enter the URL where you have RevenueHero enabled form.
- Submit a test form: If you’ve set up your tracking correctly, you should see your conversion tag fire in the Google Tag Manager preview window.
- Verify conversions in GA4: Unfortunately GA4 isn't as friendly as UA was. It often takes 24 hours for you to see the event land in your GA4 account when it is fired for the first time.
- Implement Conversion Linker Tag: We've written about this in detail over here. But here's the gist — setting up conversion linker tag allows you to retain your GCLID and reduce the chances of your Google Ad being attributed as Direct, which reduces the pace at which Google Ads learning about which conversion matters for your organization.
That’s it! You’ll now have a conversion event sent to your Google Ads every time a qualified meeting is booked through RevenueHero. The best part is, you’ll never have to wait for weeks for your reps to update values in the CRM to send this data back to your Google Ad account.


