.png)
I’ve had a tough time in the past trying to set up lead routing on HubSpot.
I made my fair share of mistakes in the past. It was cumbersome and had me constantly question myself if I set it up correctly.
*Thanks Jim for constantly pinging me on why it didn’t get assigned to you.*
We previously covered and went into detail about what lead routing is and why you should implement it. So I won't talk about it again.
Instead, I’ll show you how you can implement lead routing for your organization using HubSpot. Ready?
Let’s dive.
Get the foundation right: Questions to ask before you begin
Every organization is different with unique GTM motions. With that in mind, here are a few questions to ask yourself (and your entire GTM team) before you begin setting up your lead routing.
Psst… I’ve been burned by not getting this right.
- How are leads entering your CRM?
- When leads enter the CRM, what happens?
- How and when should leads be passed off to your team members? (think lead qualification, interests, activity, contact properties, and behavior)
- Which of your sales people and account executives touch leads and when?
- When are leads considered sales or marketing qualified?
When you have answers to the above questions, you’ll have a good picture of how your leads flow through your CRM.
Now, it’s time to map your lead flow to a corresponding HubSpot property. For example, if you need employee size to be greater than 100 to qualify a lead before they’re routed, under what property is that value stored in your HubSpot CRM?
This is critical because you’ll need a system in place to collect the data required to make your lead routing a reality.
Now that we’ve got the basics out of the way, let’s dive into the meat of this article.
We’re gonna set up lead routing for the following scenario:
- We want to route leads to the right AE when a prospect requests a demo/contacts us.
- All leads are qualified only if the employee size is greater than 50. If they’re not qualified, they need not be routed to any AEs.
- We have two AEs. Each AE owns a specific region — USA and UK.
- When leads from respective regions come through, we’ll need to route them to the right AE and assign tasks to them.
Note: While this article dives into lead routing in HubSpot for this scenario, you can customize it to suit your requirements.
How to set up triggers for lead routing in HubSpot?
Step 1:
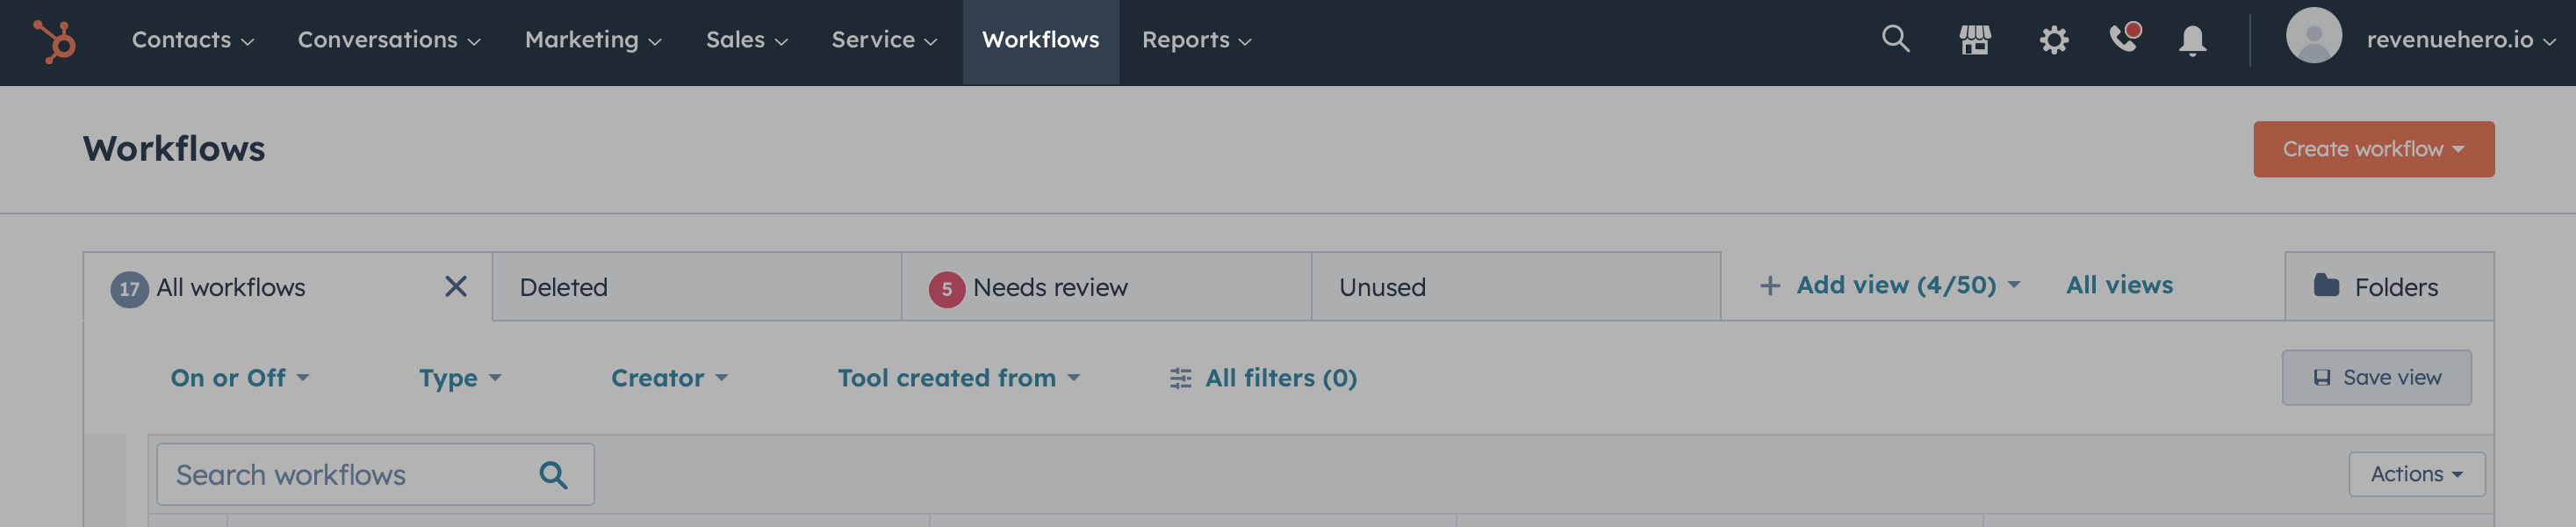
To set up lead routing in HubSpot, we’re going to use Workflows.
Navigate to Workflows in your HubSpot account by clicking on Automation -> Workflows in the top nav bar. Some accounts might not have Automation in the nav bar. If this is true for your account, you’ll find Workflows on the nav bar.
Step 2:
Once you’re in Workflows, click on the Create Workflow button. From the dropdown menu, select From scratch

Step 3:
Since we’re going route leads to AE based on the details a contact enters, in the next screen we’ll select Contact-based and Blank workflow before we click on Next.
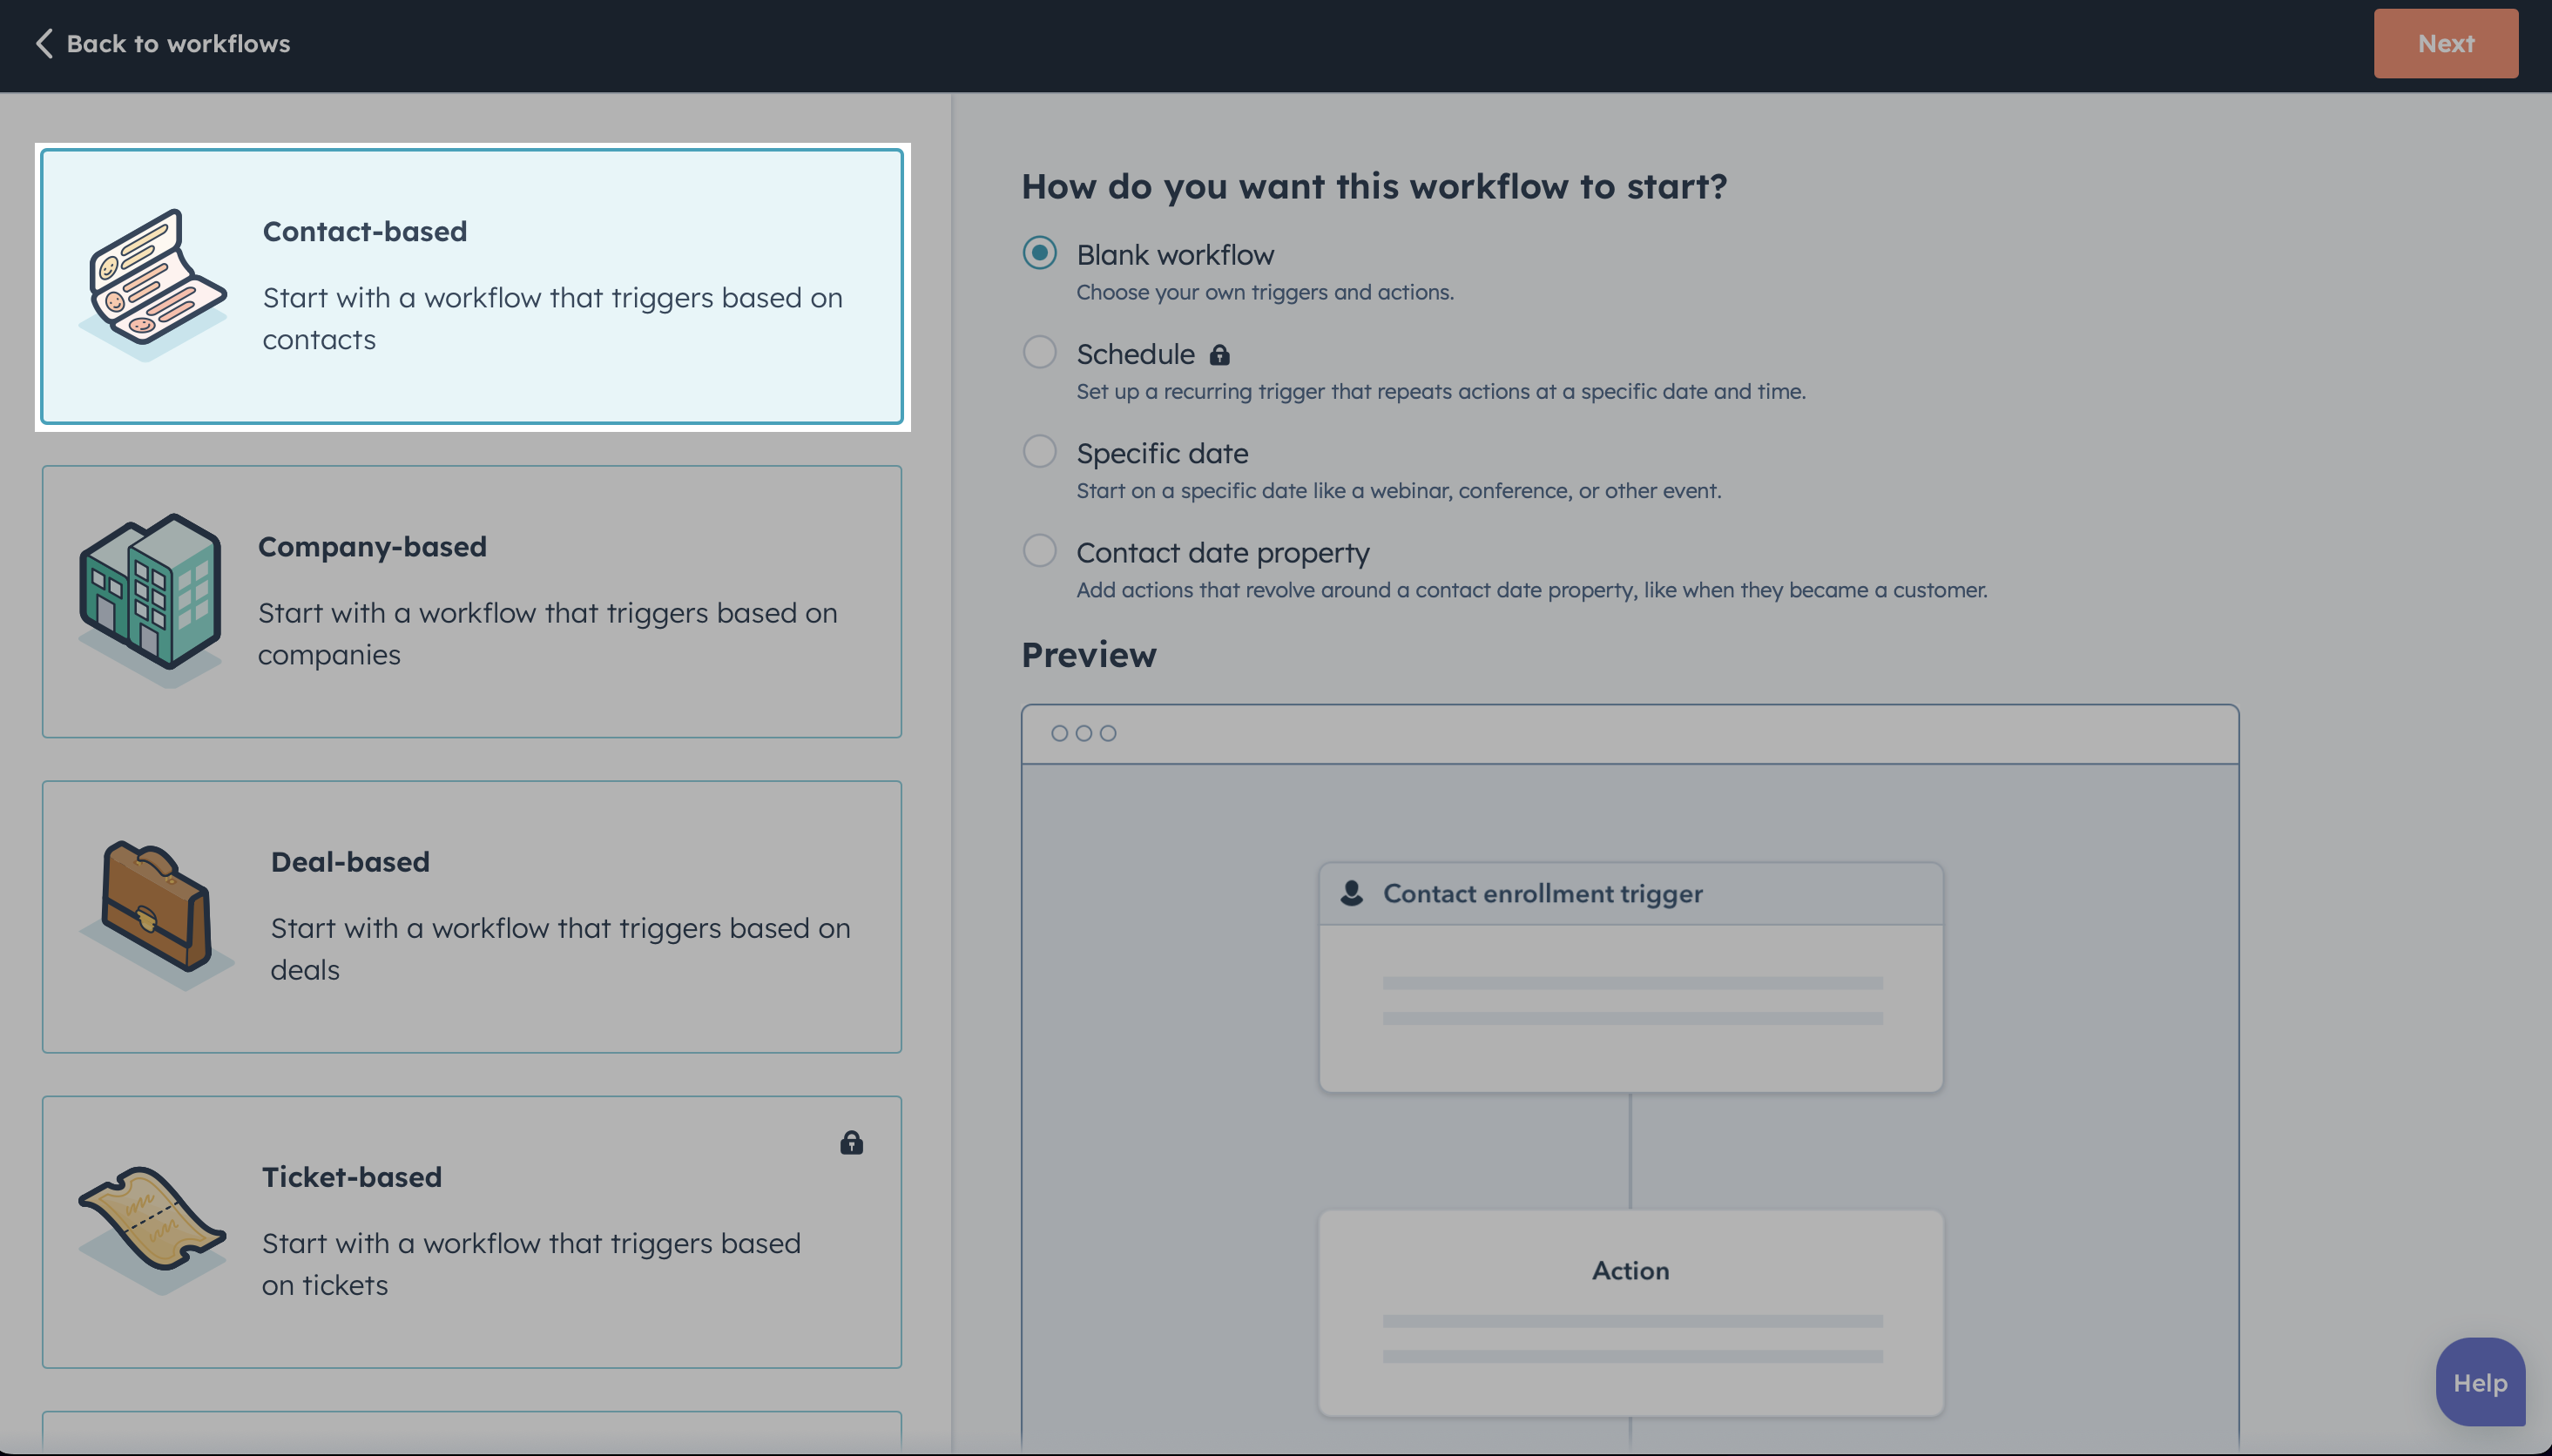
Step 4:
Now, we’ll have to set up triggers to tell HubSpot when a contact has to get enrolled into this workflow.
Since we want contacts to enter into this workflow when they request a demo/contact us by submitting a form, we’ll set that as the trigger.
To do this, we’ll click on Set up triggers and filter by Form submissions.
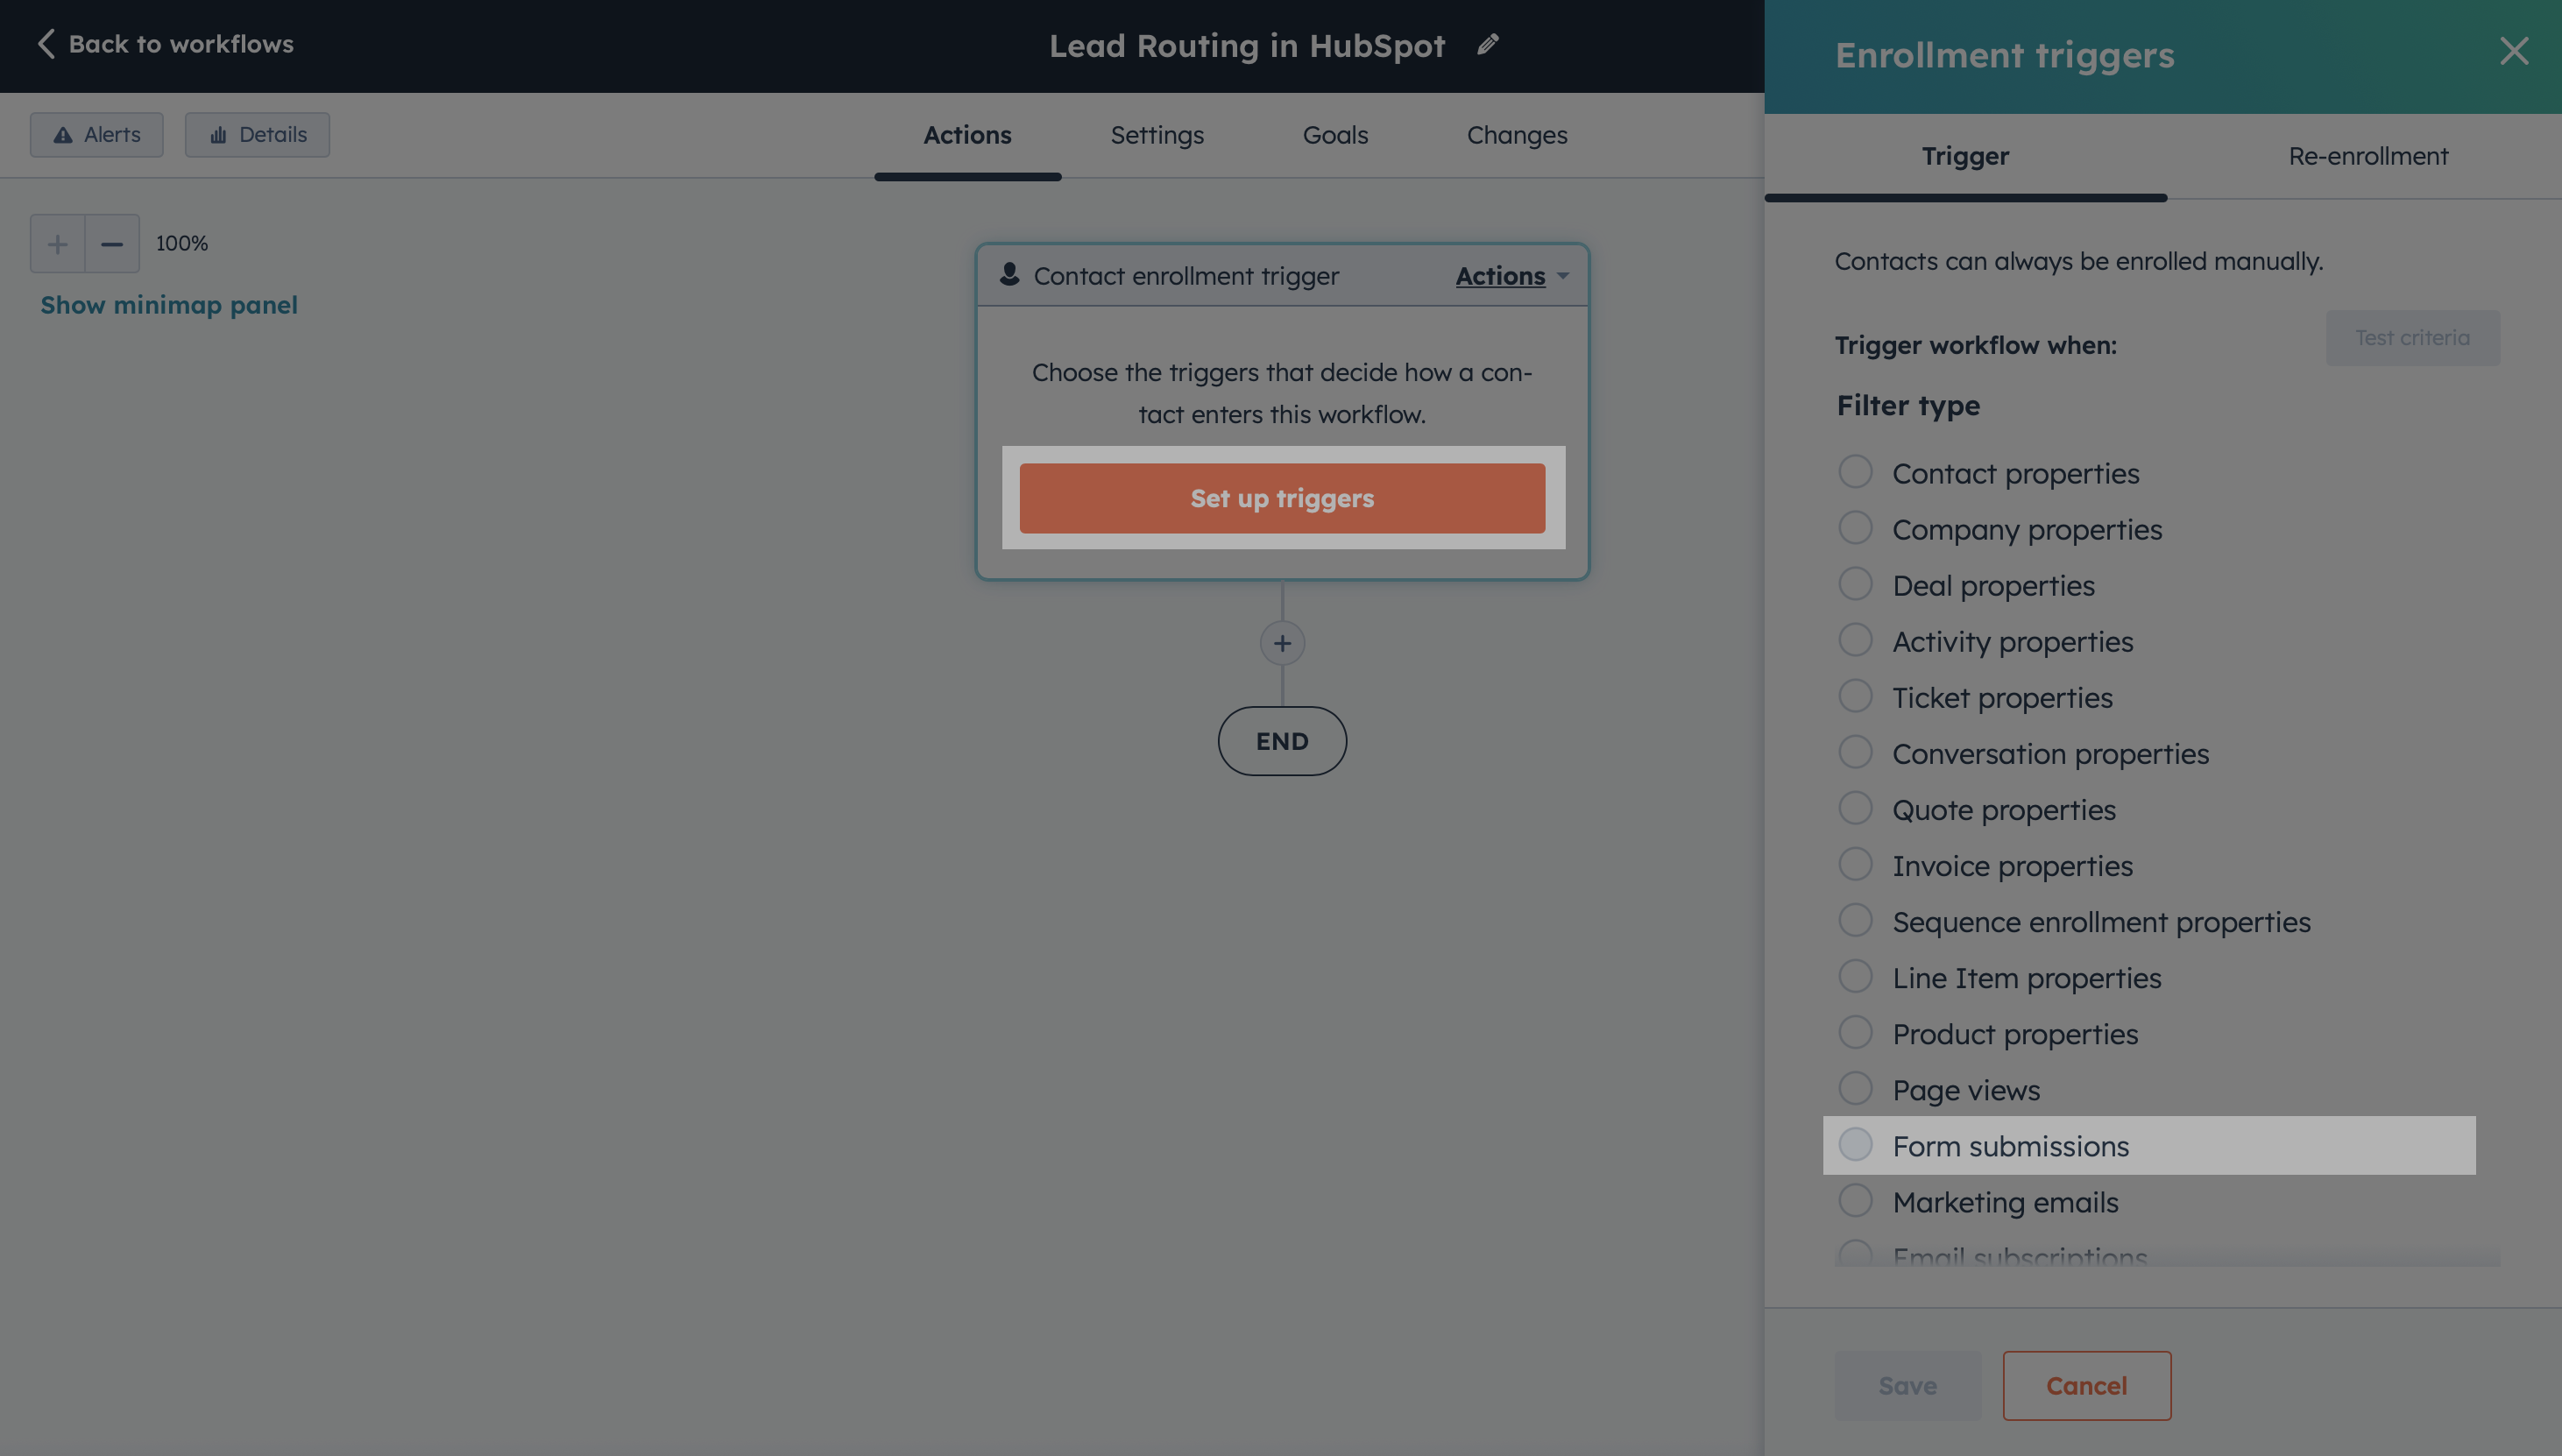
We’ll search for our form, select it, click on Apply filters and click Save.

How to qualify leads before routing leads in HubSpot?
Step 5:
Now, we’ll need to qualify the leads before they get passed on to the right AE. To do this, we’ll add an If/then branch and check if the employee size is greater than 50. If it isn’t, the lead will exit the workflow and will not get assigned to an AE.
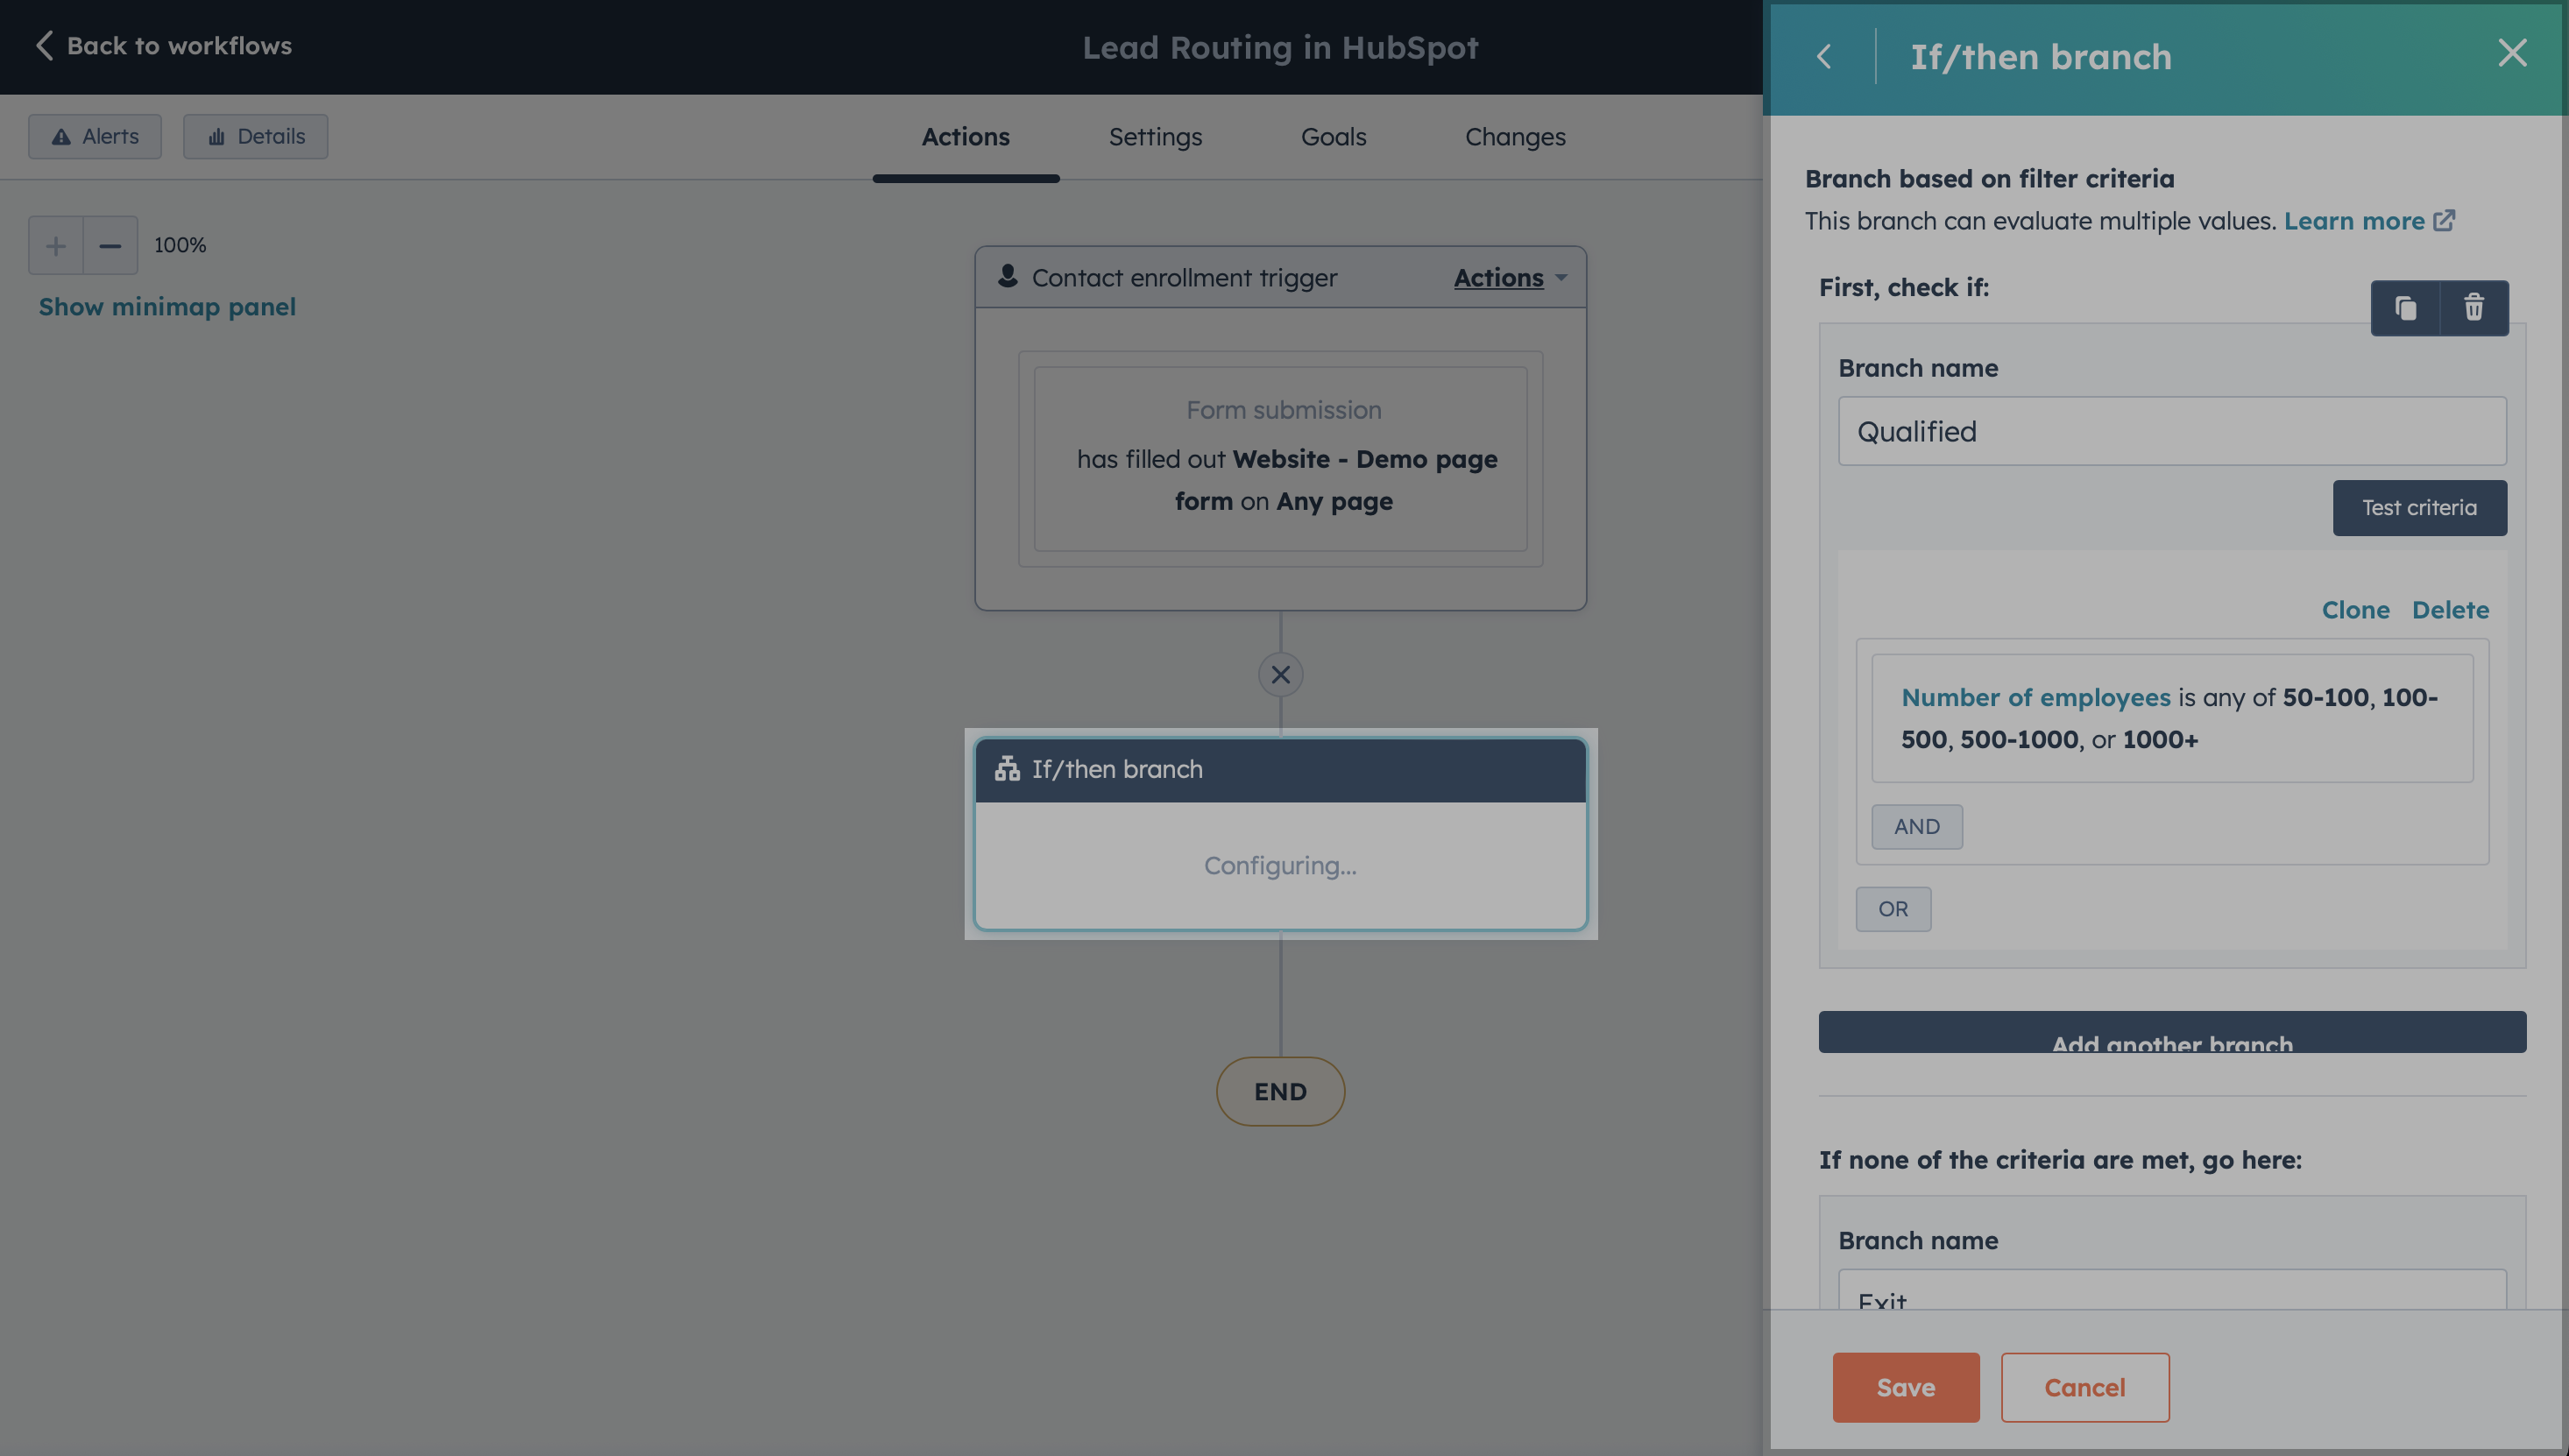
Setting up lead routing in HubSpot
Step 6:
If the lead is qualified, we’ll create another If/then branch and check which country they’re from. We check for this value using the IP country property.
If the lead is from North America, we create an action called Set property value and set the contact owner to the respective AE. In this case, it’s John Stewart. Once assigned, we also create a task asking the AE to reach out to the lead.

We duplicated the process for Rest of the World and assigned it to Martha Wayne, our AE for the UK region.
And since we want to capitalize on all opportunities that come our way, in case any of the leads that come in aren’t from the USA or UK, we automatically assign them to Matt Banner.
Disadvantages of setting up lead routing in HubSpot
As with anything in tech and life, there are always disadvantages when you implement workarounds. So, I thought it’s only fair that I be straight with you on this one and list all the potential hiccups you’ll have when you try to implement lead routing on HubSpot.
Here we go:
- Nuances of round-robin or custom logic lead distribution: Once you have a team of AEs, you’ll immediately want to set up round-robin distribution or even your custom logic. This is incredibly hard to set up in HubSpot while keeping in mind all the edge cases.
- Lead to account matching: Imagine a lead is already in your HubSpot CRM and assigned to an AE. When they come back and book a demo with you, you don’t want them getting assigned to someone else on the team, right? You’d want to make sure they’re assigned to the same rep. Unfortunately, setting this up in HubSpot will have you creating multiple nested if/then branches.
- Complex lead qualification: In the above scenario, we had a common qualification criteria across regions. But in reality, you might have different qualification criteria for different regions. Setting this up in HubSpot can be cumbersome and is often a good recipe for disaster if you’re not careful. Oftentimes, people resort to creating separate workflows for each region. But let’s be honest, we’re already drowning in a sea of workflows. Nobody wants another, right?
- Routing log: If your sales rep ever pings you asking why a lead didn’t get assigned to them, you’ll have no way to backtrack all the steps a lead went through to give your sales rep a definitive answer. It’ll all be a guessing game at this point.
- Instant Scheduling: And here’s the kicker… If you get a lead that is qualified and routed to the right sales rep, wouldn’t you want to book a call with them immediately? Why make them wait till your sales rep gets back to them with an email or phone call? No matter how many workflows you create or stitch together, this is unfortunately not possible with HubSpot or HubSpot meetings.
If you’re looking to solve any of the above disadvantages with HubSpot, come check out RevenueHero.
Of course, I’m a bit biased here. But I’d be doing you a great disservice if I didn’t at least point you in the right direction. Especially if it means no changes to your workflows or your CRM, and you get all the benefits.
Let RevenueHero help your team turn high-intent users into booked meeting without slowing down your funnel.

Leading all things marketing