.avif)
No matter how much I dread Salesforce, I’ve got to admit Salesforce’s assignment rules are incredible.
Assignment rules in Salesforce help your team determine who gets what leads and cases based on specific criteria you set up. It's all about streamlining your GTM process and making sure nothing falls through the cracks.
Picture this: your organization is rocking different GTM motions, right? Inbound leads, website-generated leads, event imports, you name it. Well, guess what? You can create assignment rules for each of these motions.
For example, you can have a kickass rule for inbound leads and another one for event follow-ups. Oh, and don't forget about cases. You can set up rules for weekdays, weekends, and holidays. It's all about keeping things organized and making sure the right people are on the case.
But here's the kicker. As your organization grows, things get messy. You're stuck with just one rule in Salesforce. One!
Seriously, even your carbonated sugar water has more variety.
So, what do some organizations do? They create this massive assignment ruleset and cram every rule entry in there. It doesn't matter if it's for inbound, event follow-up, segmentation, or territories—they just shove it all in one place. Talk about a recipe for chaos!
In this post, I'm gonna share some best practices for Salesforce lead routing and assignment rules. We'll show you how to keep your team engaged with those precious leads and speed up your time-to-revenue.
Ready? Let's do this!
How to define lead assignment rules for lead routing in Salesforce?
When it comes to assignment rules in Salesforce, your Salesforce administrator can only have one active rule at a time for your go-to-market motions. This assignment rule serves a dual purpose: automating lead routing when new leads enter your CRM and managing customer-facing processes within your CRM.
Let's start with the lead assignment rules.
Lead assignment rules define how leads are assigned to your sales reps. Whether they're manually created, captured from your website, or imported through SFDC's Data Import Wizard, these rules ensure proper allocation. Additionally, case assignment rules come into play when you want to assign support questions. Think of this as a use case for customer support and customer success functions.
Getting the basic flow for your lead assignment and routing in Salesforce right
Every organization is different with unique GTM motions. With that in mind, here are a few questions to ask yourself (and your entire GTM team) before you begin setting up your lead routing.
Psst… I’ve been burned by not getting this right.
- How are leads entering your CRM?
- When leads enter the CRM, what happens?
- How and when should leads be passed off to your team members? (think lead qualification, interests, activity, contact properties, and behavior)
- Which of your salespeople and account executives touch leads and when?
- When are leads considered sales or marketing qualified?
When you have answers to the above questions, you’ll have a good picture of how your leads flow through your CRM.
How to set up a lead assignment in Salesforce for lead routing?
To get started with assignment rules in Salesforce, follow these steps:
- Login to Salesforce and click on Setup in the upper right corner of the horizontal navigation bar.
- In the Setup search box, type "assignment rules" and select either Lead Assignment Rules.
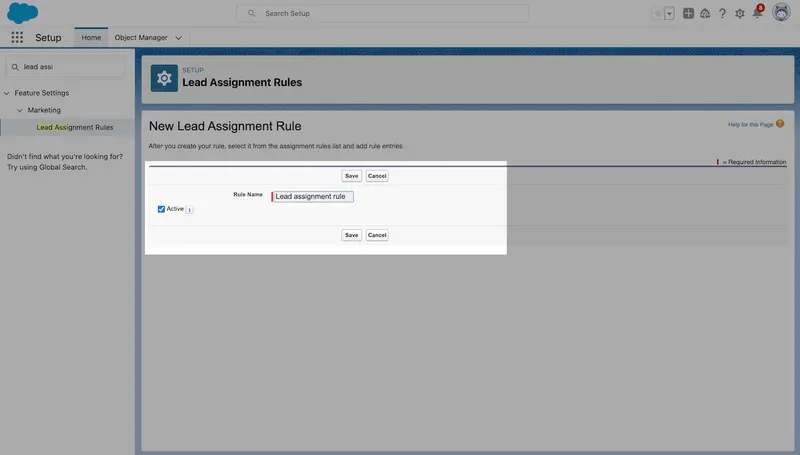
- Click on New to create a new assignment rule.
- In the Rule Name box, provide a name for your rule.
- Once done, click Save.
- Open your newly created rule and select New in the Rule Entries section to define your rule criteria.
a. In Step 1 of the "Enter the rule entry" window, enter an Order for your new rule. The Order determines the processing sequence, similar to a queue.
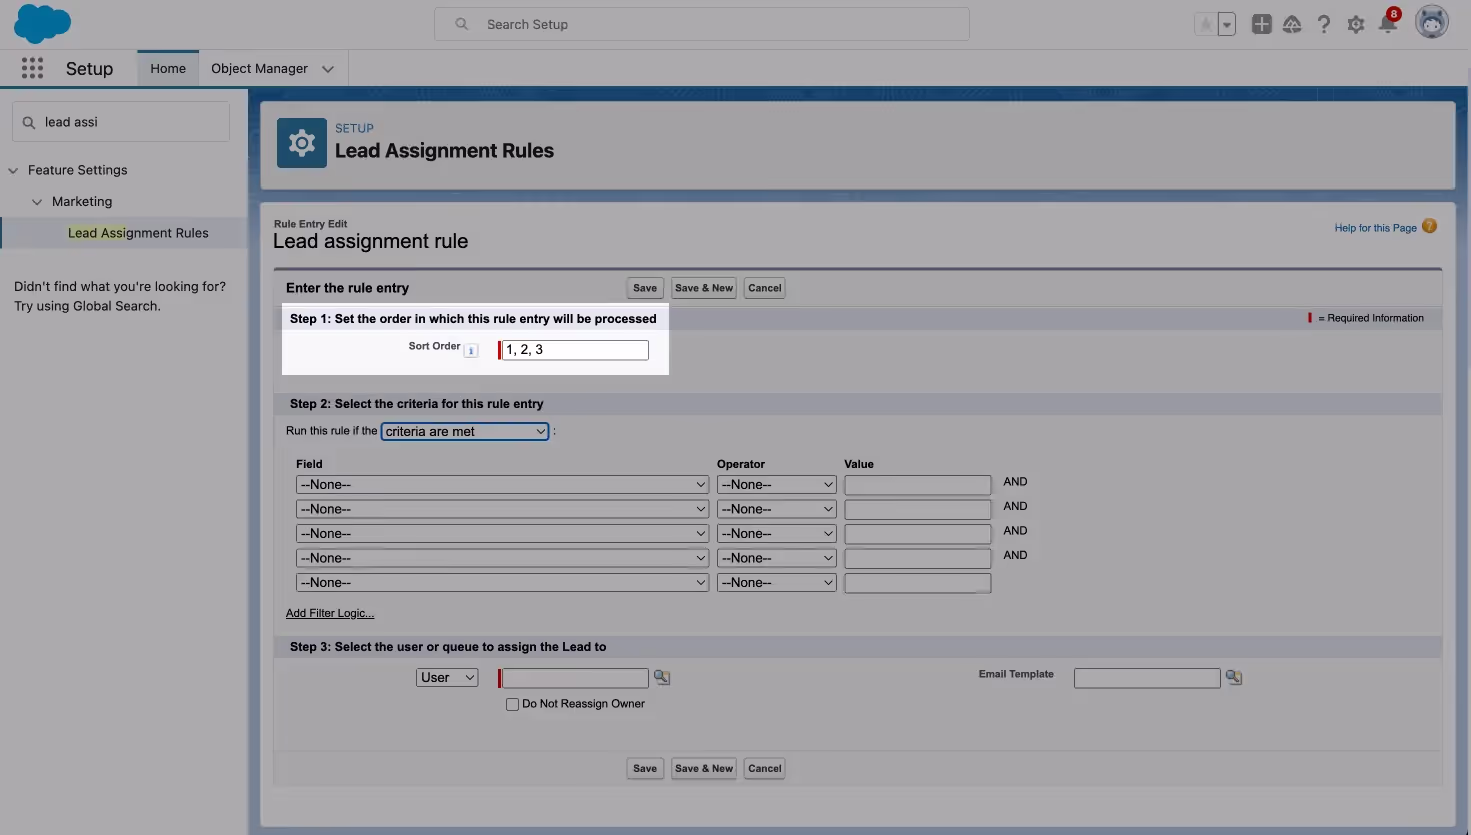
b. In Step 2, decide whether your rule should be based on meeting specific criteria or a formula. In the "Run this rule if" dropdown box, choose either "criteria are met" or "formula evaluates to true".
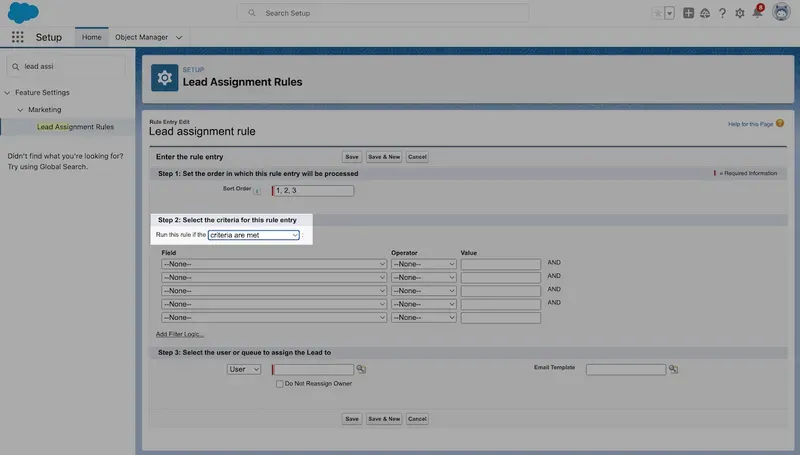
c. Once you’ve selected how you want to trigger the rules, use the drop down to set the criteria for the rule entry
d. Finally, in Step 3, select the user or queue to whom your rule will assign the new lead or case. You can use the lookup feature to find specific users or a queue
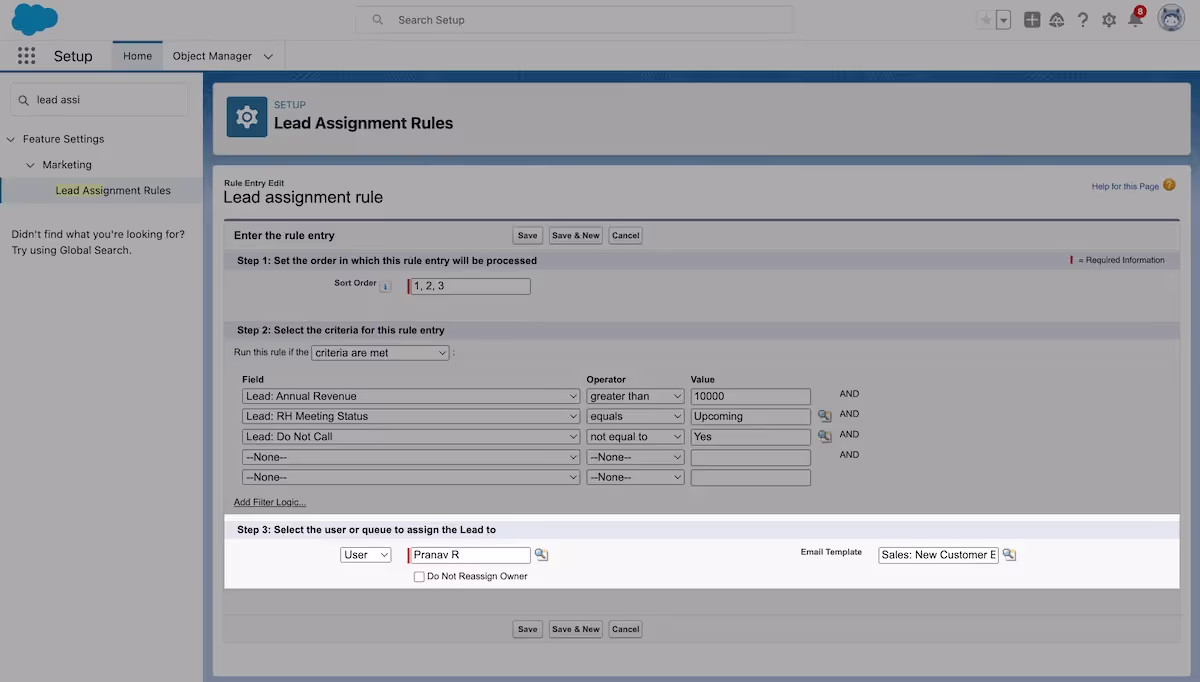
e. Once you've completed Step 3, click Save.
That’s it! You’ve now set up a lead assignment rule in Salesforce.
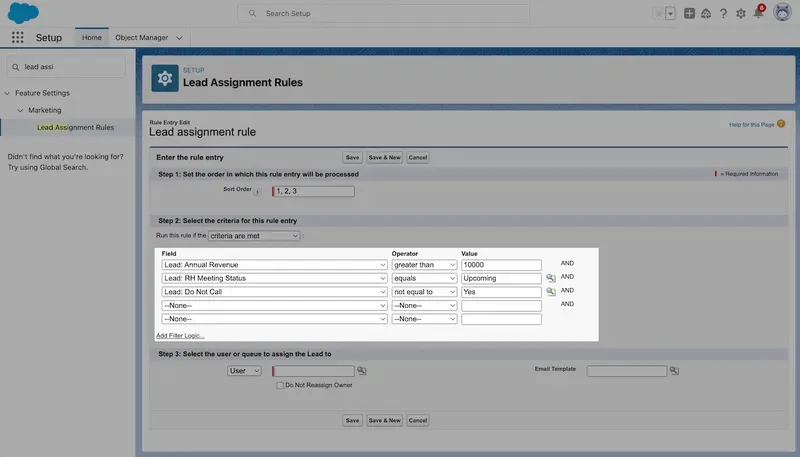
If you’d like some inspiration for your next lead assignment rule, consider this example:
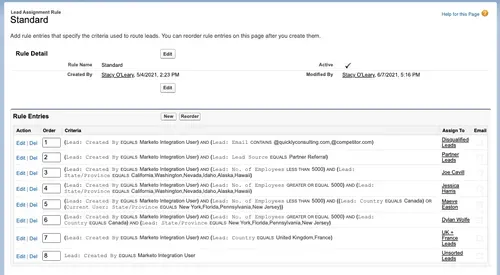
In the above example, you can see that we are:
- Disqualifying leads that come from competitors
- Routing leads that come from our partnerships to partnerships expert
- Routing leads that have less than 5000 employees to Joe Cavill
- Sending leads who have more than 5000 employees to Jessica
Two reasons why your lead assignment might not work as expected
If you're facing issues with your lead or case assignment rules not functioning properly, here are a few tips to troubleshoot and identify the root cause quickly.
- First and foremost, check if the assignment rule is active. Remember, you can have only one active case or lead assignment rule at a time.
- Next, ensure that the record is assigned to the correct user or queue and verify that the checkbox "Assign using active assignment rule" has been selected. To support this step, consider enabling field History tracking on the case or lead owner and adding object History (case or lead) to your page layout.
These measures can help track any changes made to ownership.
One common issue to watch out for is overlapping rule entries or entries in the wrong order. When you have multiple rule entries, it's possible for them to overlap, leading to unpredictable record assignments.
For example, if entry #1 assigns New York leads to Henry and entry #2 assigns Demo Request leads to Terry, Henry might end up receiving Demo Request leads intended for Terry. To avoid such confusion, review the order and arrangement of your rule entries carefully.
Disadvantages of lead assignment and lead routing with Salesforce
When it comes to implementing lead assignment and routing on Salesforce, there are a few downsides you need to be aware of. Here's a list of potential hiccups you might encounter along the way.
- Round-robin or custom distribution: First up, let's talk about the nuances of round-robin or custom logic lead distribution. When you have a team of AEs, you naturally want to set up fair distribution or implement your own custom logic.
However, doing this in Salesforce can be quite challenging, especially when you need to consider all those pesky edge cases. What if the lead is assigned to an AE and she falls sick on the day of the demo call? Naturally, a teammate takes the demo. Now, how do you add the original AE back to the queue and give her another lead since this got reassigned to someone else? - Lead-to-account matching: Picture this scenario: a lead is already in your Salesforce CRM and has been assigned to an AE. Now, when they come back and book a demo with you, you definitely don't want them to go through a round-robin distribution and get assigned to someone else on the team, right? You want them to stick with their designated rep. Unfortunately, achieving this in Salesforce is impossible.
- Complex lead qualification: Lead qualification shouldn’t require you to write complex code. Unfortunately, that’s what it’ll take when you try to do lead qualification with Salesforce.
- Routing log: Imagine your sales rep reaches out to you, wondering why a lead didn't get assigned to them. Well, in Salesforce you can track an object’s history to see when properties change, but you won't have a clear way to track all the steps that led to the assignment (or lack thereof). It becomes a guessing game, and nobody wants to play that.
- Instant scheduling: And finally, we have the big one. When you have a qualified lead that's been routed to the right sales rep, wouldn't it be amazing to book a call with them right away? No need to make them wait for an email or phone call from your sales rep. Unfortunately, no matter how many workflows you create or stitch together, this is simply not possible with Salesforce.
These are the challenges you might face when implementing lead routing on Salesforce. But hey, awareness is the first step toward finding solutions, right? Keep these in mind as you navigate the world of Salesforce.
How RevenueHero simplifies lead assignment for you in Salesforce?
At first, it seems pretty straightforward, but here's the catch: you're limited to having just one rule. Now, imagine as your GTM motions get more complex and your organization grows.
That one rule starts to feel like a ticking time bomb, ready to explode with multiple defining rule entries. With each entry you add, the rule becomes more unwieldy and harder to manage.
With RevenueHero integrated to your Salesforce CRM, here’s what you’ll get:
- Show the right sales rep’s calendar after a form is submitted.
- Auto-qualify leads after form-submit using custom logic.

- Automatically log all meeting activity to your Salesforce CRM to create custom reports.
- Use custom Round-robin logic and weighted assignments to ensure smoother account handovers.

- Eliminate tedious CRM cleanups and matching errors by automating lead to account matching.
Of course, I’m a bit biased. But based on what existing customers say, Salesforce works. But Salesforce + RevenueHero makes you win.
Let RevenueHero help your team turn high-intent users into booked meeting without slowing down your funnel.

Leading all things marketing