


.webp)

What we’ll explore in this playbook
We previously looked at how to send “Qualified Meeting Booked” as a conversion event.
Since Google Ads supports enhanced conversion tracking that allows you to send first-party conversion data from your website, we’ll explore how you can send a qualified prospect’s email address along with the conversion event to Google Ads every time they book a meeting with you.
Ready?
Here's a quick flowchart showing you what you can do:
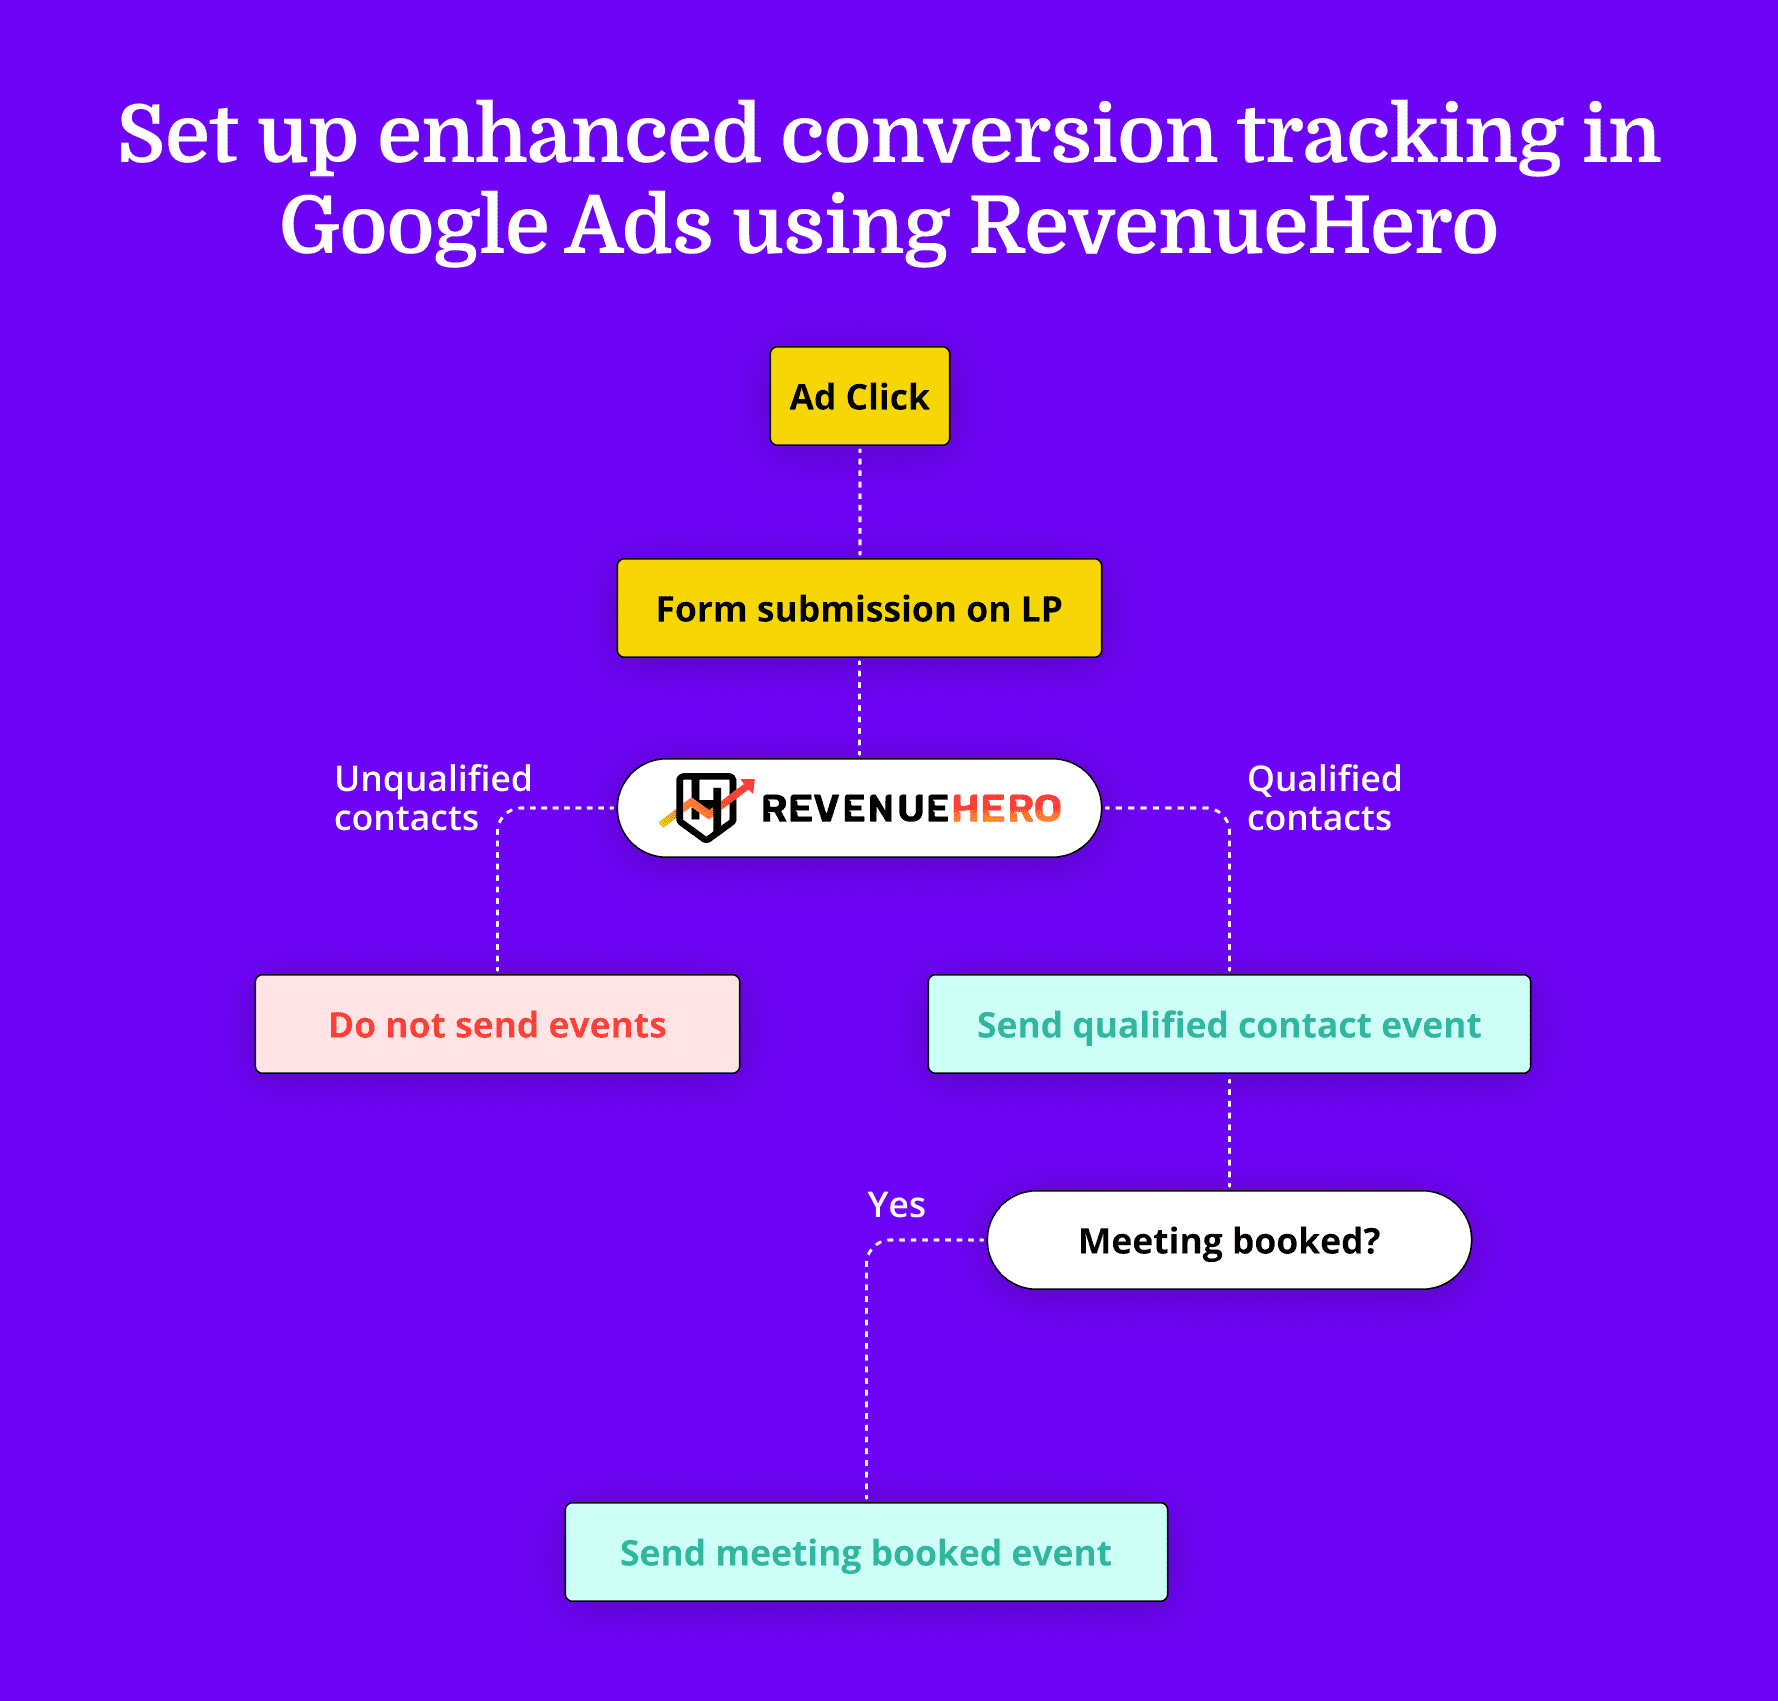
Step 1: Automate lead qualification, disqualification, and meeting booking process
One of the things marketers typically have a hard time with is understanding if the lead they generated is qualified or not and if it moved further down the funnel. In B2B organizations that sell high ACV products, marketers need to wait for weeks to get this data.
Let’s reduce weeks of waiting to minutes by automating the initial qualification/disqualification process and the meeting booking process.
What you’ll need in this step:
- A demo request form/CTA connected to your CRM
- Admin access to your CRM
- Separate landing pages to redirect people:
- Qualified lead who booked a meeting.
- Qualified lead who did not book a meeting
- Disqualified lead
- RevenueHero account
- Admin access to RevenueHero
To connect your CRM form to a RevenueHero router, in your RevenueHero account:
- Navigate to Inbound
- Create new router
- Map your CRM form to RevenueHero and choose how these form properties are stored in your CRM.
- Setup Matching rules to ensure that existing accounts/contacts are routed to the same sales rep.
- For net new contacts, set conditions based on form values or enriched data. When these conditions are met, RevenueHero automatically qualifies them, routes them to the right sales rep based on routing conditions you set, and displays their calendar for the prospect to book a meeting. When the conditions aren’t met, the prospect will be automatically disqualified.
- In the final step, enter URLs for where you’d like to redirect prospects. You can enter separate URLs for:
- Qualified leads who booked a meeting
- Qualified leads who did not book a meeting, and
- Disqualified leads.
Once this is done, you now have a setup where every demo request data is sent to RevenueHero. RevenueHero then checks if each form submission is qualified or not, displays meeting slots of the right sales reps, and passes every meeting activity back to the CRM.
Step 2: Send Conversion Event to Google Ad via Tag Manager
We'll use RevenueHero's Javascript Events to send accurate conversion data back to Google Ads. This approach gives us more control over which events we want to track.
With RevenueHero, we can qualify leads and show the scheduler only to them. When a meeting is scheduled through RevenueHero, it sends an event called `meeting_booked`. We'll capture this event using a tag manager and send it to Google Ads.
To do this, we’ll need to:
- Create a listener tag that listens to RevenueHero’s Javascript event
- Create a data layer variable in Google Tag Manager
- Create a custom event trigger to listen to the event
- Create a “User-provided data” variable.
- Setup Google Ads Conversion Tracking
- Configure which data we want to send for Enhanced Conversions
Don’t worry. We’ll cover each of these steps in detail.
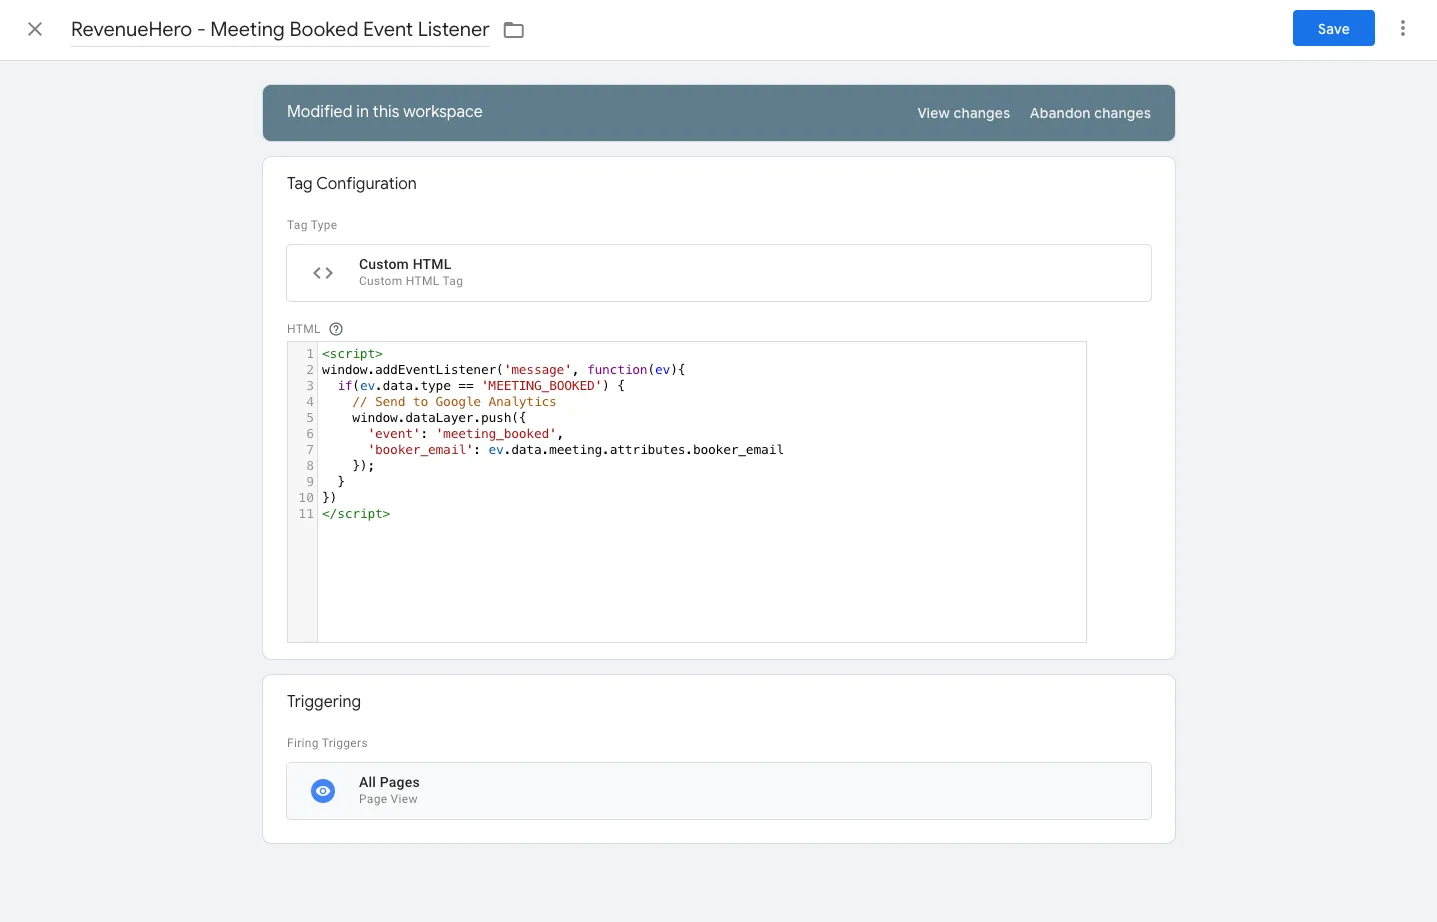
1. Create a tag to listen to RevenueHero’s Javascript event
First, we’ll have to tell Google Tag Manager to listen to RevenueHero’s Javascript event.
To do this:
- Go to “Tags” in GTM and click on “New.”
- Name your tag something descriptive, like “RevenueHero - Meeting Booked Event Listener”.
- Choose “Custom HTML” as the tag type.
- Add the following code in the HTML field:
<script>
window.addEventListener('message', function(ev){
if(ev.data.type == 'MEETING_BOOKED') {
window.dataLayer.push({
      'event': 'meeting_booked',
      'booker_email': ev.data.meeting.attributes.booker_email
});
}
})
</script>
- In the above script, we’re using ’event’:’meeting_booked’as the event we want to send.
- ’'booker_email': ev.data.meeting.attributes.booker_email’gives us the email ID of the person who booked a meeting with us. You can head over to our help article to see all the information you can send with the event.
- Under “Triggering”, choose for this tag to fire on “All pages”.
- Save your tag.
2. Create a data layer variable in Google Tag Manager
In the previous step, we’re sending ’event’: ‘meeting_booked’ and 'booker_email': ev.data.meeting.attributes.booker_email to the data layer of your browser. Next, we’ll need to tell Google Tag Manager that we need it to read these variables’ values, so that it can be passed to other tags, triggers, and variables.
To do this:
- In your Google Tag Manager (GTM) account, navigate to “Variables” and click on “New” under “User defined variables”.
- Name your variable something descriptive, like “RevenueHero Meeting Booked Variable.”
- Inside “Variable Configuration”, choose “Data Layer Variable” as the variable type.
- In the “Data Layer Variable Name” field, enter “event” (without quotes).
- Save your variable.
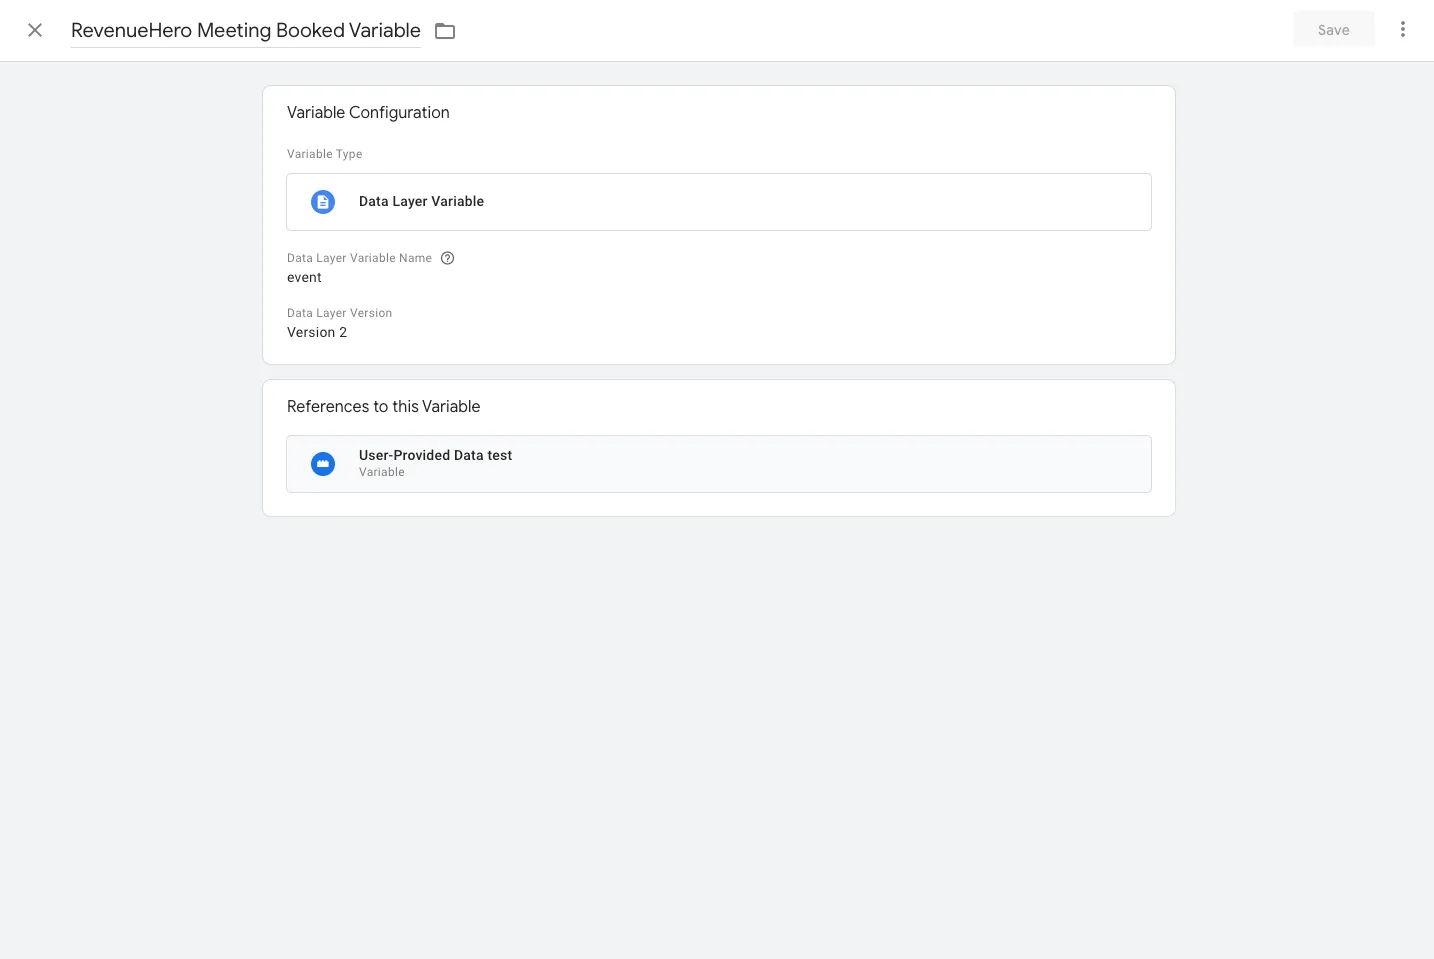
Don’t forget to create another variable for booker_email. Name this variable as “RevenueHero Booker Email Variable”. We’ll need this to pass to the “User-provided Data” variable.
Great! Google Tag Manager will now be able to read and pass values of ‘meeting_booked’ and `booker_email`.
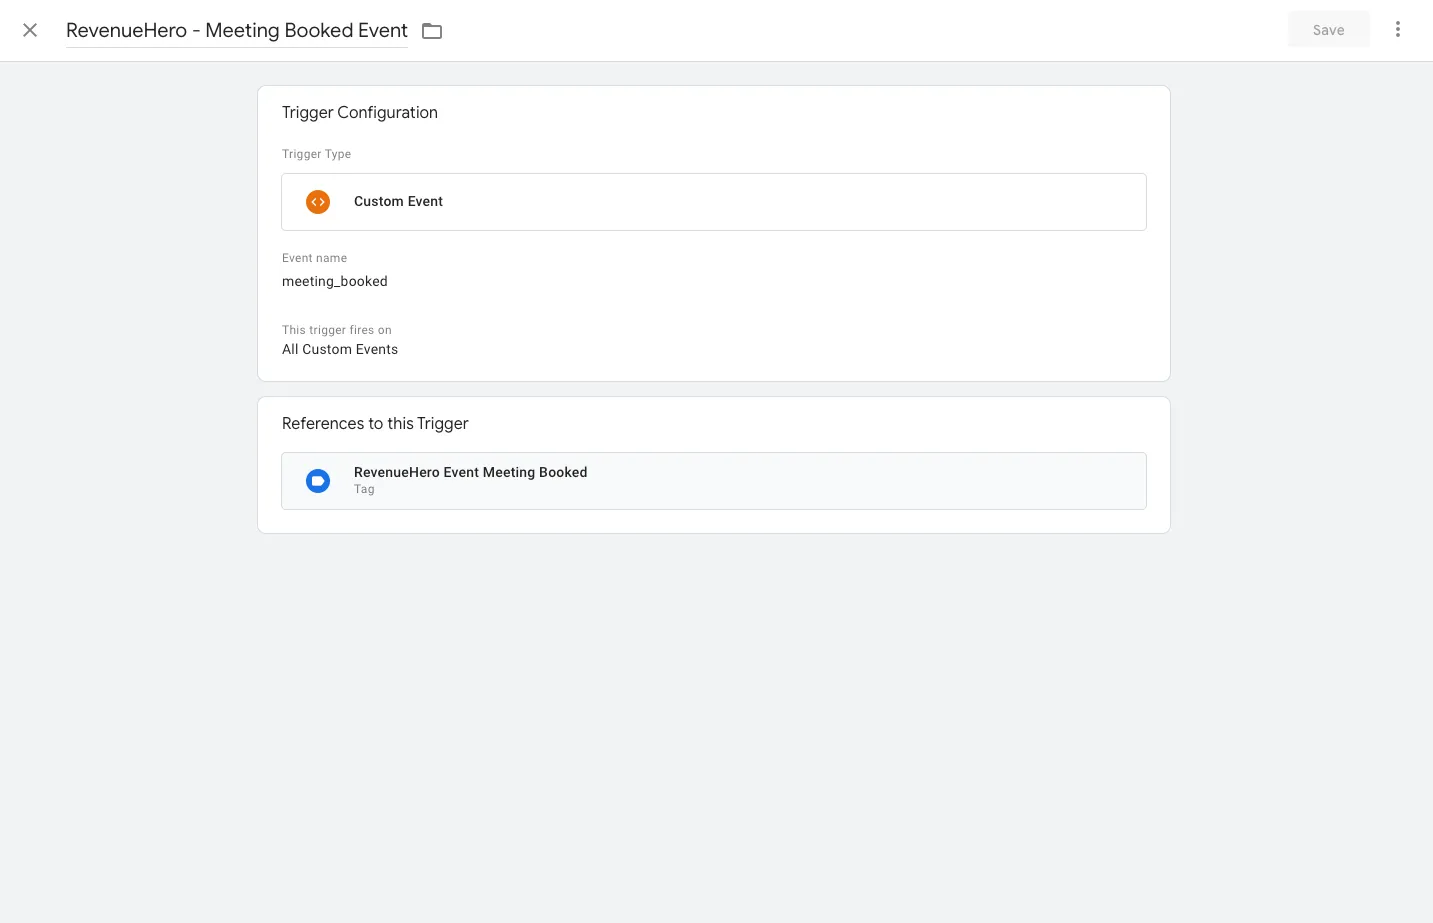
3. Create a custom event trigger to listen to the event
Next, we need to ensure our events are created only when a meeting is booked. So we’ll create a trigger when the data layer receives the variable that we defined in the previous step.
To do this:
- Go to “Triggers” in GTM and click on “New.”
- Name your trigger something like “RevenueHero - Meeting Booked Event”.
- Choose “Custom Event” as the trigger type.
- In the “Event Name” field, enter “meeting_booked” (without quotes) because this is the value that will be sent to the data layer.
- Leave “this trigger fires on” set to “All custom events”.
- Save your trigger.
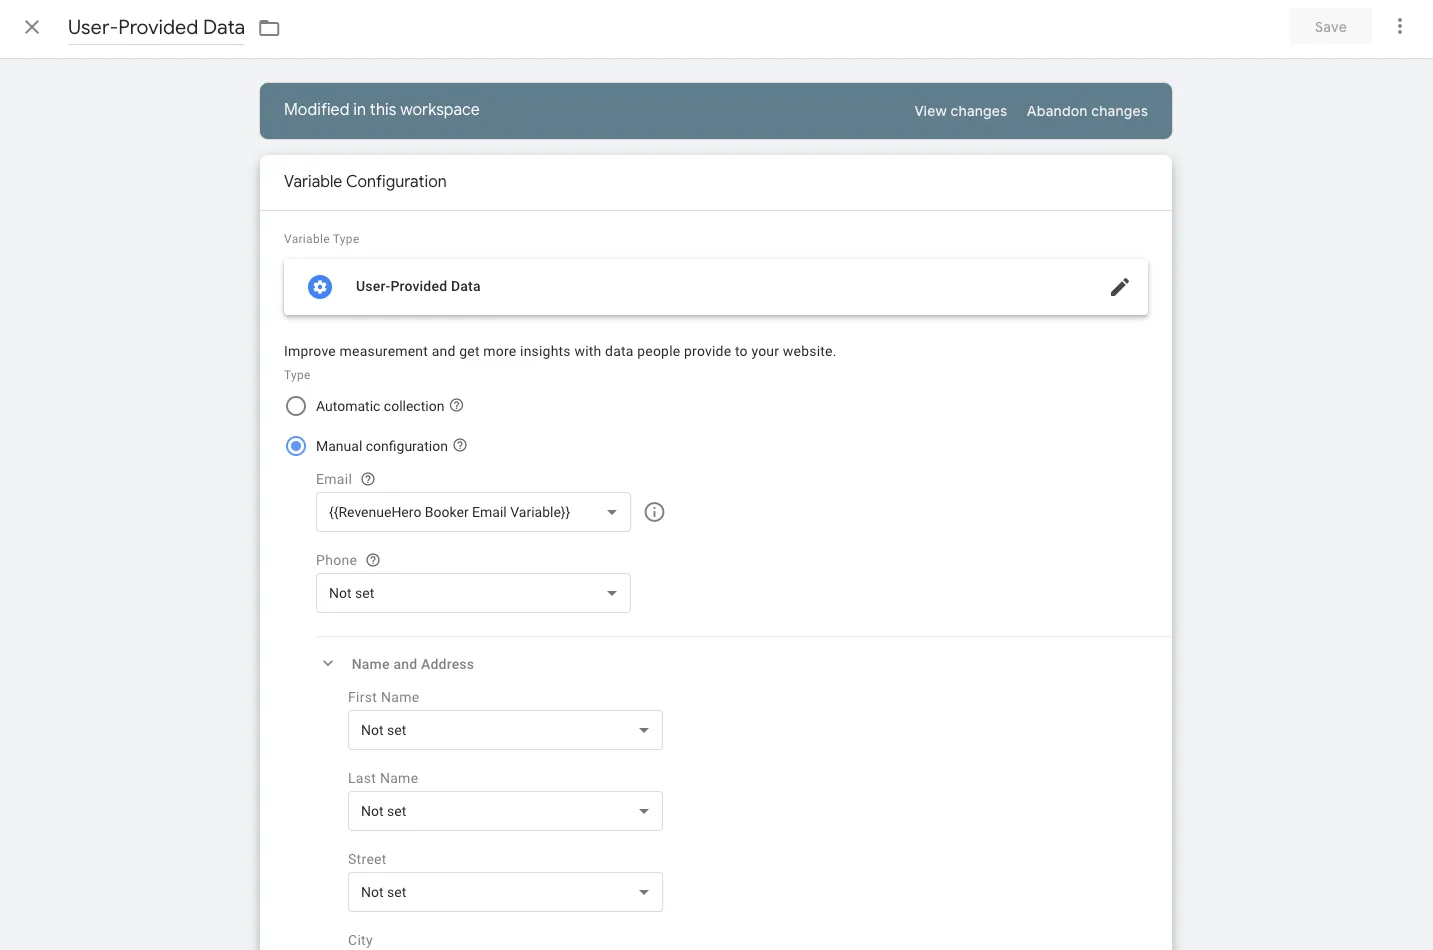
4. Create a “User-Provided Data” variable.
Next, when we set up Google Ads Enhanced Conversion tracking, we’ll need to tell the tag which variables are personally identifiable information.
To do this:
- In your Google Tag Manager (GTM) account, navigate to “Variables” and click on “New” under “User defined variables”.
- Name your variable something descriptive, like “User-Provided Data”
- Inside “Variable Configuration”, choose “User-Provided Data” as the variable type.
- Select “Manual” under “Type”.
- Click the dropdown under “Email”. Select the “RevenueHero Booker Email Variable” variable that you created in step number 2. If you passed other data using the RevenueHero Javascript and created variables, you can add them here in their respective fields.
- Save your variable.
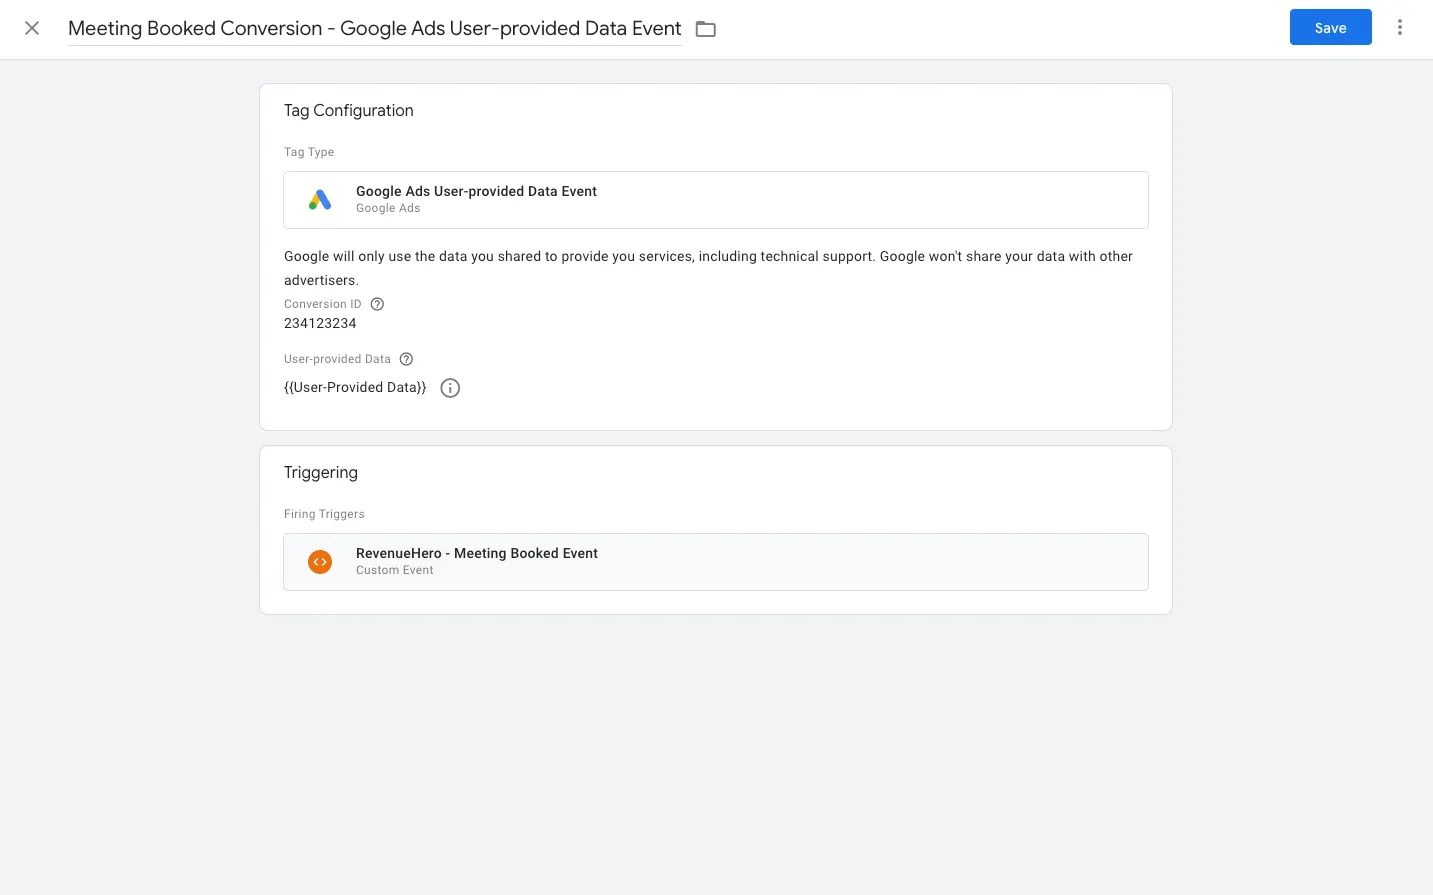
5. Create and configure your Google Ads Conversion tag to fire on a specific trigger
Now that we have a trigger set up, all that’s left to do is fire a tag that will send a conversion event to Google Ads.
To do this:
In Google Tag Manager:
- Create a new tag.
- In the Tag Configuration, select 'Google Ads User-provided Data Event’.
In Google Ads:
- In your Google Ads account, click the Tools and Settings menu.
- Select Measurement: Conversions, which opens to the Conversion Actions table.
- Select the name of the conversion that you want to use from the Conversion action column.
- Expand the tab for Tag setup to view the tag details.
- Select Use Google Tag Manager.
- Copy the Conversion ID and Conversion Label.
Back to Google Tag Manager:
- Enter the Conversion ID.
- Under “User-provided data” drop down, select the variable you created. If you named it as shown in the screenshots, it’ll be called “User-Provided Data”.
- Set the trigger for this tag as the trigger we created in the 3rd step. Again, if you followed this playbook to the T, then you should find a trigger called “RevenueHero - Meeting Booked Event”.
- Click Save.
Before publishing:
- Previewing Your Google Tag Manager Container: To preview your Google Tag Manager container, navigate to your Google Tag Manager account and click on the “Preview” button to enter preview mode. Enter the URL where you have the RevenueHero-enabled form.
- Testing Your Tracking Setup: Once you have set up your tracking correctly, you should observe your conversion tag firing in the Google Tag Manager preview window when you submit a test form.
- Verifying Conversions in GA4: GA4 may not provide real-time data like UA did. It can take up to 24 hours for the event to appear in your GA4 account after it is initially triggered.
- Implement Conversion Linker Tag: We've covered this topic extensively in this article. In essence, by implementing the conversion linker tag, you can preserve your GCLID, minimizing the risk of your Google Ad being misattributed as Direct. This, in turn, helps Google Ads learn more efficiently about which conversions are significant for your organization.
Final thoughts
That’s it! You’ve now set up an enhanced conversion event that will be sent to your Google Ads every time a qualified meeting is booked through RevenueHero. You can send a similar event for every time a qualified lead comes in by using the “Page_Loaded” event.